

Announcing Luminoth 0.1: new object detection models, checkpoints and more!

On previous blog posts, we’ve talked about Luminoth, our own open-source computer vision toolkit, built upon Tensorflow and Sonnet. Well, we just released a new version, so this is a good time as any to dive into it!
Version 0.1 brings several very exciting improvements:
An implementation of the Single Shot Multibox Detector (SSD) model was added, a much faster (although less accurate) object detector than the already-included Faster R-CNN. This allows performing object detection in real-time on most modern GPUs, allowing the processing of, for instance, video streams.
Some tweaks to the Faster R-CNN model, as well as a new base configuration, making it reach results comparable to other existing implementations when training on the COCO and Pascal datasets.
Checkpoints for both SSD and Faster R-CNN models are now provided, trained on the Pascal and COCO datasets, respectively, and providing state-of-the-art results. This makes performing object detection in an image extremely straightforward, as these checkpoints will be downloaded automatically by the library, even when just using the command-line interface.
General usability improvements, such as a cleaner command-line interface for most commands, as well as supporting videos on prediction, and a redesign of the included web frontend to easily play around with the models.
We’ll now explore each of these features through examples, by incrementally building our own detector.
First things first: testing it out
First of all, of course, we should install Luminoth. Inside your virtualenv, run:
(N.B.: If you have a GPU available and want to use it, run pip install tensorflow-gpu first, and then the above command.)
Since the addition of the checkpoint functionality, we now offer pre-trained
models for both Faster R-CNN and SSD out of the box. Effectively, this means
that by issuing a couple commands, you can download a fully-trained object
detection model for your use. Let’s start by refreshing the checkpoint
repository using Luminoth’s CLI tool, lumi:
The output shows all the available pre-trained checkpoints. Each checkpoint is
identified with the id field (here 48ed2350f5b2 and e3256ffb7e29) and with
a possible alias, here accurate and fast. Additionally, you can check more
information with the command lumi checkpoint detail <checkpoint_id_or_alias>.
We’re going to try out the Faster R-CNN checkpoint, so first we’ll download it
(by using the alias instead of the id) and then use the lumi predict command:
The lumi predict command defaults to using the checkpoint with alias
accurate, but we could specify otherwise by using the option
--checkpoint=<alias_or_id>. Anyways, here’s the output!

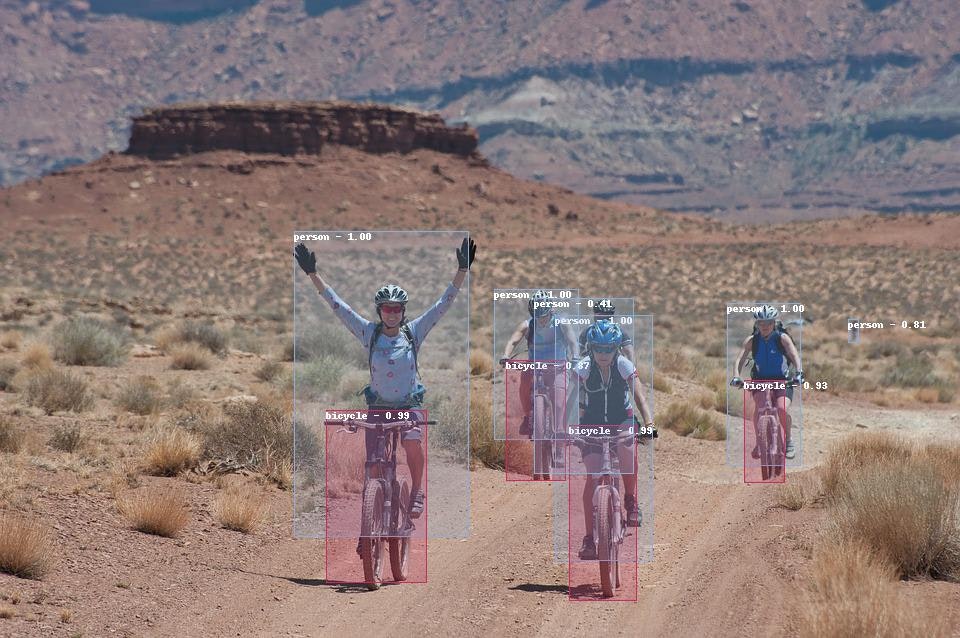
And thirty-something seconds later on a modern CPU, that’s it! You can also
write the JSON output to a file (through the --output or -f option) and make
Luminoth store the image with the bounding boxes drawn (through the
--save-media-to or -d option).
Now in real-time!
Unless you’re reading this several years into the future (hello from the past!), you probably noticed Faster R-CNN took quite a while to detect the objects in the image. That is because this model favors prediction accuracy over computational efficiency, so it’s not really feasible to use it, e.g., for real-time processing of videos (especially if you’re not in possession of modern hardware): even on a pretty fast GPU, Faster R-CNN won’t do more than 2-5 images per second.
Enter SSD, the single-shot multibox detector. This model provides a lower accuracy (which accentuates with the more classes you want to detect) while being, well, much faster. On the same GPU you get a couple images per second on Faster, SSD will achieve around 60 images per second, making it much more suitable for running over video streams or just videos in general.
Let’s do just that, then! Run the lumi predict again, but this time using the
fast checkpoint. Also, notice how we didn’t download it beforehand; the CLI
will notice that and look for it in the remote repository.
 Say hello to Emma! Woof, woof! SSD model applied to dog playing fetch.
Woo, much faster! (And less Faster 🤔.) The command will generate a video by running SSD on a frame-by-frame basis, so no fancy temporal-prediction models (at least for now). In practice, this means you’ll probably see some jittering in the boxes, as well as some predictions appearing and disappearing out of nowhere, but nothing some post-processing can’t fix.
And of course, train your own
Say you just want to detect cars from out of your window, and you aren’t interested in the 80 classes present in COCO. Training your model to detect a lower number of classes may improve the detection quality, so let’s do just that. Note, however, that training on a CPU may take quite a while, so be sure to use a GPU or a cloud service such as Google’s ML Engine (read more about Luminoth’s integration with it here), or just skip this section altogether and look at the pretty pictures instead.
Luminoth contains tools to prepare and build a custom dataset from standard
formats, such as the ones used by COCO or Pascal VOC. You can also build your
own dataset transformer to support your own format, but that’s for another
blog post. For now, we’ll use the lumi dataset CLI tool to build a dataset
containing only cars, taken from both COCO and Pascal (2007 and 2012).
Start by downloading the datasets from
here,
here and
here and storing them into a datasets/
directory created on your working directory (specifically, into
datasets/pascal/2007/, datasets/pascal/2012/ and datasets/coco/). Then
merge all the data into a single .tfrecords file ready to be consumed by
Luminoth by running the following commands:
Now we’re ready to start training. In order to train a model using Luminoth, you must create a configuration file specifying some required information (such as a run name, the dataset location and the model to use, as well as a battery of model-dependent hyperparameters). Since we provide base configuration files already, something like this will be enough:
Store it in your working directory (same place where datasets/ is located) as
config.yml. As you can see, we’re going to train an SSD model. You can start
running as follows:
Many hours later, the model should have some reasonable results (you can just stop it when it goes beyond one million or so steps). You can test it right away using the built-in web interface by running the following command and going to
$ lumi server web -c config.yml
Neither checkpoint not config specified, assuming accurate.
- Running on https://127.0.0.1:5000/ (Press CTRL+C to quit)

Wondering how AI
can help you?

Terms and Conditions | © 2026. All rights reserved.