

ROS: the framework to accelerate your next robotics project


Whenever you start a new project there is a large list of tasks you have to keep in mind, but when you start a robotics project, this list grows really fast. You might start with hardware: actuators, sensors, controllers, computers, etc. Then you annotate a list of drivers to handle your hardware and communicate with the rest of the robot. At this point, you remember all the modules you will need in your robot:
- A perception module to process the sensor data.
- A world model module to represent the physical world.
- A decision-making module that defines the robot's behavior to achieve its goal.
- A communication module for connecting every module.
- A visualization module for debugging and setup.


Suddenly, the task becomes overwhelming. But fear not, because there is a specialized framework widely used in robotics that comes to your rescue. It’s called ROS.


ROS, from Robot Operating System, is a free and open-source framework for complex robot applications. The aim of ROS is to help build such applications faster by providing a standard framework with common tools and solutions to cross-cutting problems in robot development.
The most important functionality of ROS is its inter-process communication. With ROS you can develop several modules and connect them to effortlessly share data. This feature solves the interoperability problem by enabling the use of modules implemented in different languages (such as C++ or Python) or using some of the thousands of useful packages with battle-tested algorithms for all kinds of issues that pop up in robotics: from low-level drivers of sensors and actuators to complex algorithms for navigation, manipulation, and perception.
In this post, we will review the main concepts behind ROS with a simple example to showcase how it can accelerate your next robotics project.
ROS Concepts
Even though ROS provides the services you would expect from an operating system such as hardware abstraction, device control, process messaging, and package management, ROS is not actually an operating system. It’s a framework that provides libraries and tools to create robot applications (also called robotics middleware).

ROS 2
This post is about ROS as it is still the most used framework, but ROS 2 is growing fast! Most concepts here are valid for ROS 2, but be aware of the differences if using the latter.
The most important concept in ROS is the Computation Graph: the network of processes of the robot. Each process is a node in this graph and can be connected to other nodes either by messages or services (for asynchronous or synchronous communication respectively). Additionally, messages are sent through topics that allow many-to-many communication using a publish-subscribe model, while services allow a request-replay interaction that is implemented as a remote procedure call. Each graph has a Master node that helps connect the different nodes and stores data by key to be accessible in the graph.
Sample project
Let’s make this all clear by imagining how we would structure a simple project in ROS: we will make a smart light that follows a person on a stage, using a camera.


We will divide the problem into 4 processes and build a pipeline: read the image from the camera, detect the person, calculate the light position, and move the light. Each process will be a ROS node. Let's define how we will build and connect them!
The roslaunch tool
Camera Driver: this node will connect to the camera and publish the images in a topic. As this is a very common task, we can search for an existing node, such as
cv_camera_node, that implements a proper driver for our camera. The topic in which the images will be published will be calledcv_camera/image_raw.Person Detection: this node will subscribe to the
cv_camera/image_rawtopic, and will define a callback function that will be called whenever a new image is published. This function will detect one person in the image and publish its result in theperson_detection/persontopic. We can use an existing YOLO ROS node, follow a C++ tutorial that implements an OpenCV detector, or we can userospyto program the node using Python and any state-of-the-art detector made available by the ML community, such as YOLOv7.Light Position: this node will subscribe to
person_detection/personand calculate the desired position of the light given the person detection, and will publish it tolight_position/position. We have to take the position of the person in the camera coordinate system and transform it into the light coordinate system. Fortunately, the transformation between coordinate frames is a well-studied problem in robotics with a great solution in ROS: the transform library tf2. This awesome tool will reduce the effort to solve the problem and, again, it can be done either in C++ or Python!Motor Driver: depending on the hardware constraints we will need to implement a driver or use an existing driver if the motor has one. This driver will subscribe to
light_position/positionand will be in charge of moving the light to the objective position.


Another great feature of ROS is the roslaunch tool. This tool allows us to set up each node and its parameters in an intuitive .launch file format called launchfile and run everything from a single command. You can also tweak some robustness settings to specify the desired behavior of the whole project in case of an error in a node.
ROS even supports remote execution using SSH, meaning your nodes don’t have to be constrained to one hardware device. With roslaunch you can run nodes on different computers with a single command, making it possible to include edge devices for tasks that require specific hardware. For example, adding GPU capabilities for image processing using Nvidia Jetson is straightforward, as is using a Raspberry Pi for a fast prototype. Altogether with the modularity of the nodes, the entire project can be tested in a single development computer and deployed in a distributed setting by simply running a different roslaunch file.
At this point, we have everything we need to build and run our project! The beauty is that most of the tasks are solved by using existing nodes and setting them up, so we can focus on the problem-specific tasks that will add value to our solution.
Code Reusability
The strength of using a modular design is the possibility of reusing code, even our own. Let’s solve the problem of adding a second light that aims at the same person.

We need to receive the detection coordinates, transform them into the coordinate system of the new light, and move the light accordingly.
As all of this is already implemented in the light_position and motor_driver, all we have to do is run a second instance of these nodes with different names and parameters. In practice, we will modify the existing launchfile to rename the light_position and motor_driver nodes to light_position_left and motor_driver_left, and add additional light_position_right and motor_driver_right nodes with the parameters of the new light. We’ll do the same with the topic names, ending up with light_position_right/position and light_position_left/position. As ROS uses a publish-subscribe model, the person_detector node behavior is independent of the number of subscribed nodes and doesn’t need to be modified at all.
And just like that, we added a new light!

Modularity
Let’s think about a harder feature. Now we want the lights to be able to follow up to two different people on the stage.

We need to modify the person detector to publish up to two different people, but we also need to be able to track each one from the previous frame so each light follows the same person. We will create a new node called people_detection with the same detection algorithm as before, but adding tracking capabilities using Norfair. By using tracking, we can assign a unique identifier to each detection and have a higher frame rate, as the tracker can run faster than the detection algorithm. An important consideration is that a higher frame rate will help by enabling frequent updates to the light position and therefore smoother light movement.
Now that our detector has tracking capabilities, we can publish the detections in different topics for different people, people_detection/first and people_detection/second, and modify the launchfile so each light_position node subscribes to one of the detection topics.

Even though we needed to make some changes to the project structure, we were still able to reuse most of the code and easily add a new functionality. It is straightforward to see how easily we can modify this project to add any number of lights, making this solution scalable.
Other tools
At this point, we have covered most of our needs for our robotics project, but ROS can also help us in debugging, visualization and development by using some of their great tools. Next, we go over some that we believe to be the most relevant.
Bags are a storage format for ROS messages. By using the rosbag command you can record the messages published in the computational graph. These bags can later be played back in ROS, in the same order as they were recorded.
A .rosbag file can be used as a dataset record, for visualization, debugging, and development. In our example, we can record the frames published by the camera in a .rosbag file, and then run multiple calibration experiments of the people detection node on a completely different computer, or we can run the experiment in the stage setup to test the movement of the lights automatically.
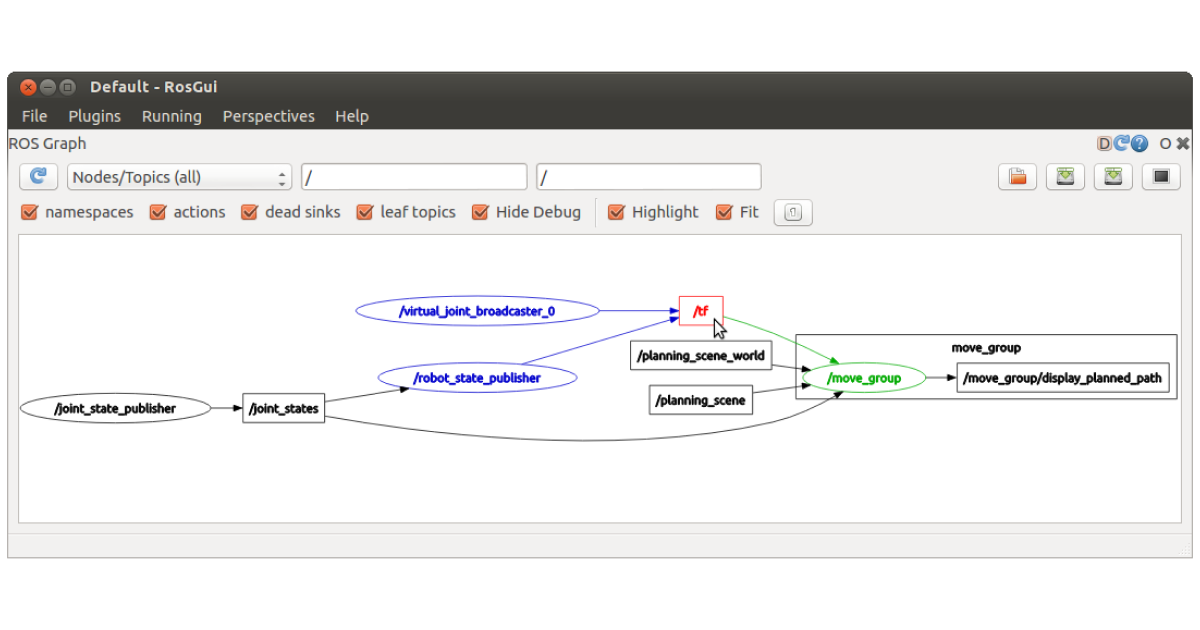
Another amazing ROS tool is rqt_graph, a GUI plugin to visualize the computational graph. This is a great way to visualize the processes and their connections.
There are several visualization tools for ROS, from general data visualization with FoxgloveStudio, 3D visualization with RVIZ, a browser-based data visualization tool called Webviz, and even an Android visualization app ROS-Mobile.
Another important tool for robotics is a simulator. ROS includes an interface with the Gazebo simulator, so you can run several experiments in a virtual environment (including components like virtual sensors and actuators) without the risk of wearing off or damaging your robot.
Finally, there is a large list of command line tools to help manage almost every aspect of your ROS project, including filesystem, logging, introspection, and commands.
Closing thoughts
Robots are no longer a Sci-Fi dream and now they are part of our lives. Starting from industries with robotic arms, carts, and forklifts, to homes with robot vacuums, lawn mowers, window cleaners, and even roads with autonomous vehicles. As more and more robots are reaching the market and people keep losing their fear of these new kinds of gadgets, interest has grown in developing robotic projects either for research, as a hobby, or to create innovative products.
The extraordinary growth in accessibility of state-of-the-art machine learning and computer vision enables robust environment sensing based on images, making it possible to create exciting projects without spending too much time on the research and development of these components.
Moreover, thanks to projects like ROS, it is nowadays possible for small teams or even single individuals to achieve things that before were only accessible to larger teams with financial backing. Your robot can start moving faster by standing on the shoulders of giants.

Do you have a robotics project in mind?

Terms and Conditions | © 2026. All rights reserved.