

Scalable infrastructure in AWS (Part I)


Let's imagine you have an API running on a single node and you need to implement a new feature that requires some heavy task processing. Obviously you can't simultaneously process the HTTP request and the task without blocking the web server. Although in Python we have a few alternatives like Celery (check our post on this or Asyncio (when the heavy task processing is IO bound, future post 😃) to handle this situation, this time we'll explore a new approach: take advantage of Amazon Web Services (AWS).
This is the first article in a series of posts about scalable infrastructure, where we will be sharing thoughts and tips on how to build scalable services.
Architecture
There are two possible approaches when designing a scalable architecture:
Vertical scalability : All the code runs in a single node. In this case scaling out means to add more CPU power, RAM, disk space, etc.
Horizontal scalability : Consists of adding (or removing) nodes when more computing power is needed.
In this article we'll focus on the second approach. We want to create an infrastructure that is able to scale in/out automatically when needed.
The following diagram shows the components involved:

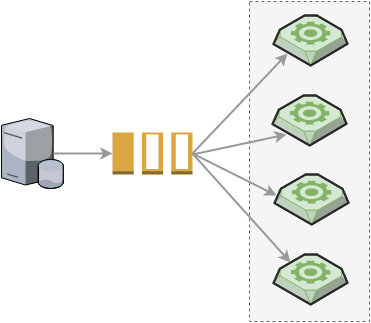
On the left we have our web server receiving HTTP requests. When a heavy task needs to be processed, a message is generated and sent to the queue in the middle. Then, a worker on the right reads from the queue and processes the task.
Now that we have an idea of how our infrastructure should look like, we need to start answering some basic questions:
- How do I deploy my code?
- Can I use Docker?
- How do I keep track of versions?
- How do I manage the queue(s)?
- How do I read from the queue?
- How many workers should I have?
- How do I auto scale my cluster?
Luckily, we have AWS (and their awesome services), which will help us answer these questions.
Implementation
In the following sections, we will go through some of the services AWS offers, describing how they answer our questions.
The first service to describe is Elastic Beanstalk. This single service will be the core of our implementation and will be in charge of solving most of our problems.
AWS EB is a platform as a service (PaaS) that allows, for instance, to create a cluster of workers, upload workers' code and track the code versions. It supports several language stacks (Python, Node, etc.) and Docker, so you can use whatever you want. It provides two types of environments: one that processes web requests (web server tier) and another that runs background jobs (worker tier). In our case, we'll be using a worker tier environment to process our tasks.
As a queue, AWS Simple Queue Service is the easiest to work with. EB worker tiers are designed around it so they are naturally a perfect fit. It is a hosted service so you don't need to deploy anything yourself.
AWS CloudWatch is a monitoring service that allows us to track various AWS services metrics. We'll use this to measure how busy our system is. One possibility is to keep track of the number of message in our SQS queue. This is very important: if the queue receives messages faster than the workers can process them, it means we need more workers.
Auto Scaling help us manage our cluster workers. Using this service we can define policies that are evaluated to decide if we need our cluster of workers to scale in or out.
Now that we know the problem, a possible solution and a set of tools that can help us, it is time to dive deeper into the implementation process.
Deployment
Everybody wants local development to be easy, no matter what OS your team is using. Furthermore, we want our code to behave the same way in our local machines and in production. It is here where Docker shines. We really like it and have posted about Docker in the past. Luckily, it fits perfectly in the EB workflow!
Our deployment process is basically divided in two phases. On the first one we define and upload our code to Amazon EC2 Container Registry (ECR), and on the second we tell EB what to run in our workers.

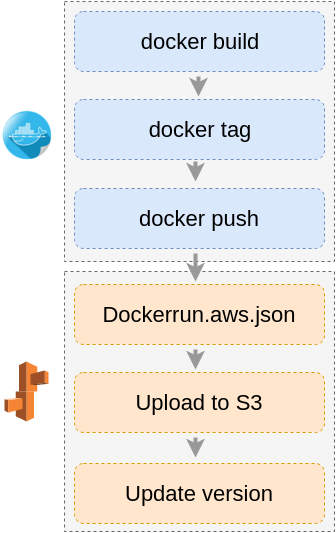
First phase
- We build our images locally.
- Then tag the image with the commit hash and the current date.
- We push (upload) it to ECR.
These steps can be done with the following code:
Second phase
Now we need to tell the workers what container to run. The way to do this is to define a Dockerrun.aws.json file. Here is an example:
Where worker-image-path specifies where to find the image we uploaded in step 3. This is a string composed of 3 parts, the first one specifies the path to the AWS ECR repository, then the image name followed by a tag. For example:
Notes:
- We are using version number 2, which supports multiple docker container definitions in the same file. It is similar to what you would get using
docker-compose. - Be careful with container memory. It is a required field and can make your containers crash if you don't define it properly.
The steps are:
- Generate a
Dockerrun.aws.jsonfile with the new image versions. - Upload the generated file to the EB Application bucket where all the versions are stored.
- Finally, we update the worker environment version with the new
Dockerrunfile definition.
These three steps can be done either manually, updating the Dockerrun.aws.json file with the image path and uploading it to the EB environment using EB interface, or automatically in Python using boto3 (we prefer this option).
Autoscaling
After we have our task-processing code running in workers, we need to find a way to control the time it takes to process all pending tasks. The idea is to monitor the number of messages visible in the queue to determine how many workers we need.
This is not possible using the polices Beanstalk provides by default. However, we can manually setup our solution. Here is what we need:
- A SQS queue linked to our worker tier.
- CloudWatch alarms:
- sqs-up-alarm: triggers when the number of visible messages is greater than a certain threshold.
- sqs-down-alarm: triggers when the number of visible messages is lower than certain threshold.
- In the worker auto scaling group (located at EC2 → Auto Scaling → find it using worker id) we need to add two policies:
- up-policy: linked to
sqs-up-alarm, it defines the numbers of instances to add depending on the number of messages. - down-policy: linked to
sqs-down-alarm, it defines the number of instances to remove depending on the number of messages.
- up-policy: linked to
This is how the scaling out process looks like:

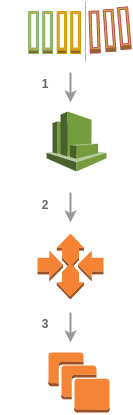
- The
sqs-up-alarmis triggered during a certain period of time. - The auto scaling group policy
up-policyis evaluated. - Amazon increases the number of workers in the cluster.
The same process is applied when scaling in.
Bonus
How to protect instances from being terminated during auto scaling?
When dealing with time consuming tasks, we have to be careful so a scale in event does not terminate instances that are not done with their work. To avoid this, AWS allow us to protect instances in an Auto Scaling Group directly from our code.
Debugging in Beanstalk
First we need to connect to a worker:
- Download aws eb command line tool.
- Init directory with Elastic Beanstalk.
- Select application and worker environment.
- Connect to a worker instance using ssh.
Once we are inside the worker instance we can play with docker commands. The only difference is that we need to execute every command with sudo privileges.
Task priorities in SQS
Unfortunately SQS doesn't support priority messages, so we need to implement them manually.
Suppose that we need a way to process certain tasks as fast as possible, here is what we need to do:
- We have to create two different worker environments with their own queues.
- The web server sends messages to one of the queues depending on the task priority.
Final thoughts
In the end, we found that this particular architecture is a very elegant and simple solution to scalability problems while allowing us to manage multiple environments (local development, staging, production) with minimal work.
In the following post, we will be talking about the migration of one of our awesome internal tools to a serverless infrastructure using AWS Lambda and DynamoDB.

Wondering how AI
can help you?

Terms and Conditions | © 2026. All rights reserved.