
Wed, Mar 17, 2021


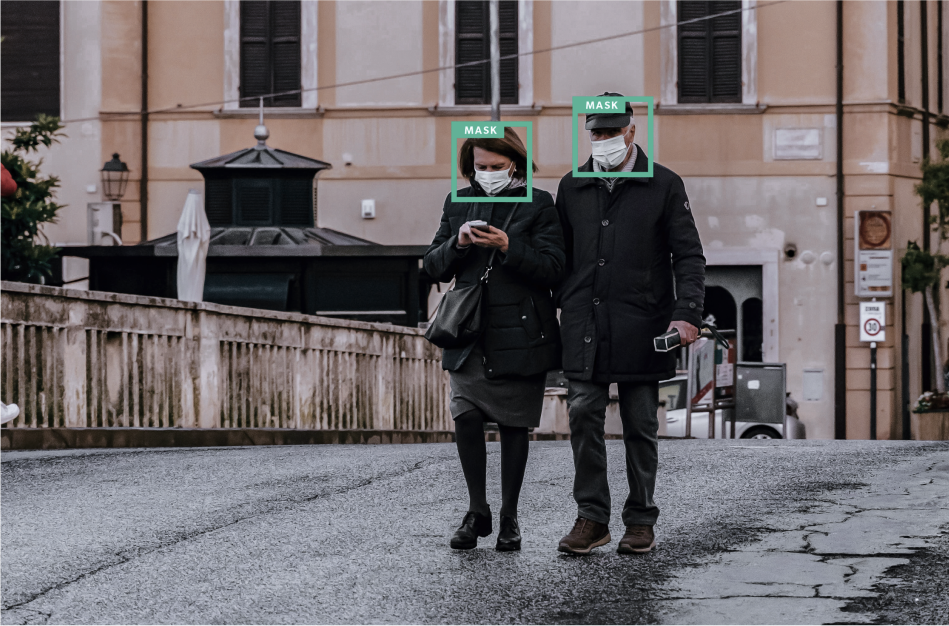
Last year, we built one of the first computer vision applications that could reliably perform face mask detection to gather statistics from real video feeds. Our article became very popular, and the work even made headlines in the international press. This year, we took things further. But we weren't alone.
We were approached by our friends at Berkeley Design Technology (BDTI), a fellow member of the Edge AI and Vision Alliance with whom we have worked on several occasions. They wanted to further develop the concept into something that can be closer to a production-ready solution. This was a great learning opportunity for us, so we didn't hesitate to jump on board. In the endeavor were also two other prestigious members of the Alliance: NVIDIA (sounds familiar?), and Jabil.
The final objective was to create a product capable of running a real-time deep learning face mask detection model on an embedded device: real-time AI on the edge. Each company had its own indispensable contribution and expertise, from hardware to software.
The result? We created MaskCam: an AI-enabled smart camera-based around Jetson Nano. It's open-source and available in GitHub under the MIT license.
In this blog post, we are going to tell the story of how MaskCam was built, how all the pieces fit together, and what challenges we faced. You will learn how moving from an AI model to a real product requires a lot of thoughtful consideration — but it's now easier than ever, thanks to the advent of powerful computers on the edge and ever-growing software tools. Without further ado, let's get to it!
AI on the Edge?
In the past, small embedded devices with constrained resources could only perform limited computer vision tasks using classical approaches. These mainly consisted of recognizing certain patterns in images that would allow for detecting some types of objects. Generally, these didn't work too well. Moreover, these models needed to run limited to a very small memory footprint, which often required entire engineering teams re-implementing them in low-level languages so that they could make full use of the capabilities of the hardware (specific circuitry). The consequence? Migrating the software to run on a new device required rewriting a significant portion of the codebase.
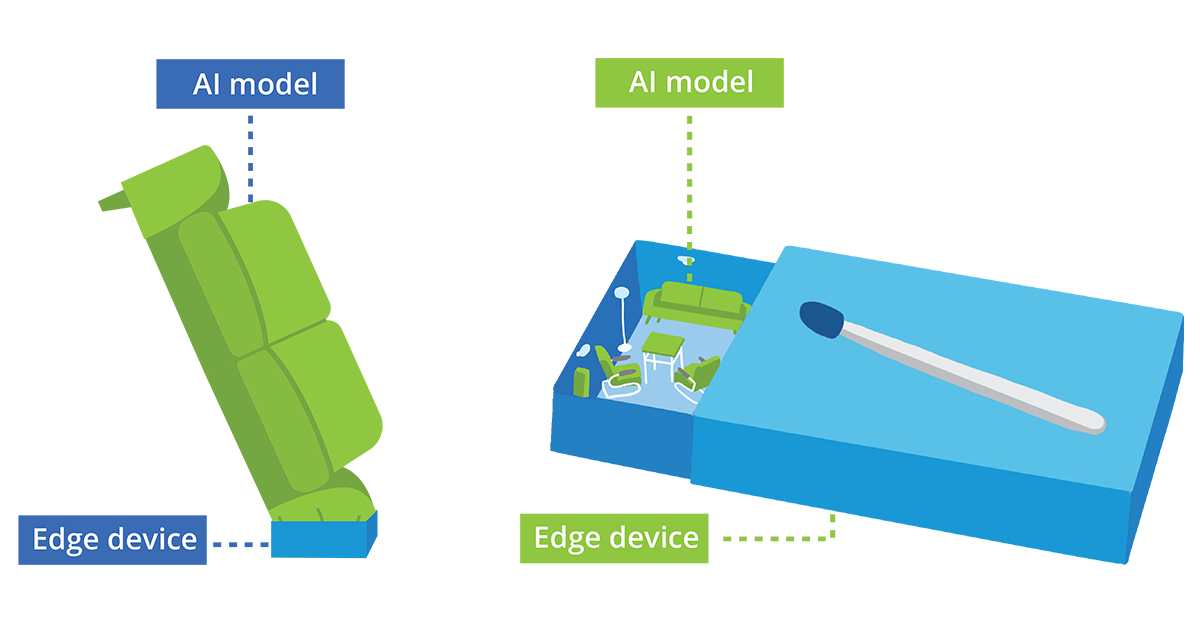
Time has passed, however, and things have evolved for good. If we had to illustrate the evolution of edge AI with a graphic example, the past would be like trying to fit a real-size sofa into a matchbox, while nowadays you can build your entire living-room inside the same box!

With current technology, both in hardware and software, the device we built could achieve things not possible long ago:
- Using a state-of-the-art deep learning model to perform computer vision, achieving detections significantly better than any classical model while requiring much less development and fine-tuning for specific tasks.
- Writing the main pieces of the software in a high-level language (Python), allowing for fast development and prototyping.
- Using hardware components that are affordable for almost any engineer eager to experiment.
- Running the code on a container that can be easily ported to other hardware platforms, while also executing a detection engine that is highly optimized for this particular device.
Specifying the requirements
First, we needed to agree on what the system should be able to do. These were the minimum requirements
Analyze video feeds in real time, on an affordable edge device.
Of course the device should be fairly robust to different lighting conditions.
Collect data, calculate statistics and send them to a remote server.
Display statistics coming from a fleet of devices in a dashboard.

While our previous software solved the problem of detecting face-masks and computing statistics from videos, it could only run on a regular desktop PC with a GPU. Now, we also needed to:
- Run the model on a much smaller and lower cost embedded device.
- Report the collected statistics to a remote web server periodically.
- Make sure that the whole system can run in real-time with minimal latency.
- Remotely manage a fleet of devices running our software (restarting device or services, viewing the logs, secure remote access, updating over-the-air)
Some of these points look fairly innocent but imply thinking of whole new approaches on how to tackle the problem from an AI perspective, iterating on the best models to use in the constrained environment, and finding the most efficient ways to run them integrated with all the other requirements.
Building MaskCam: the pieces
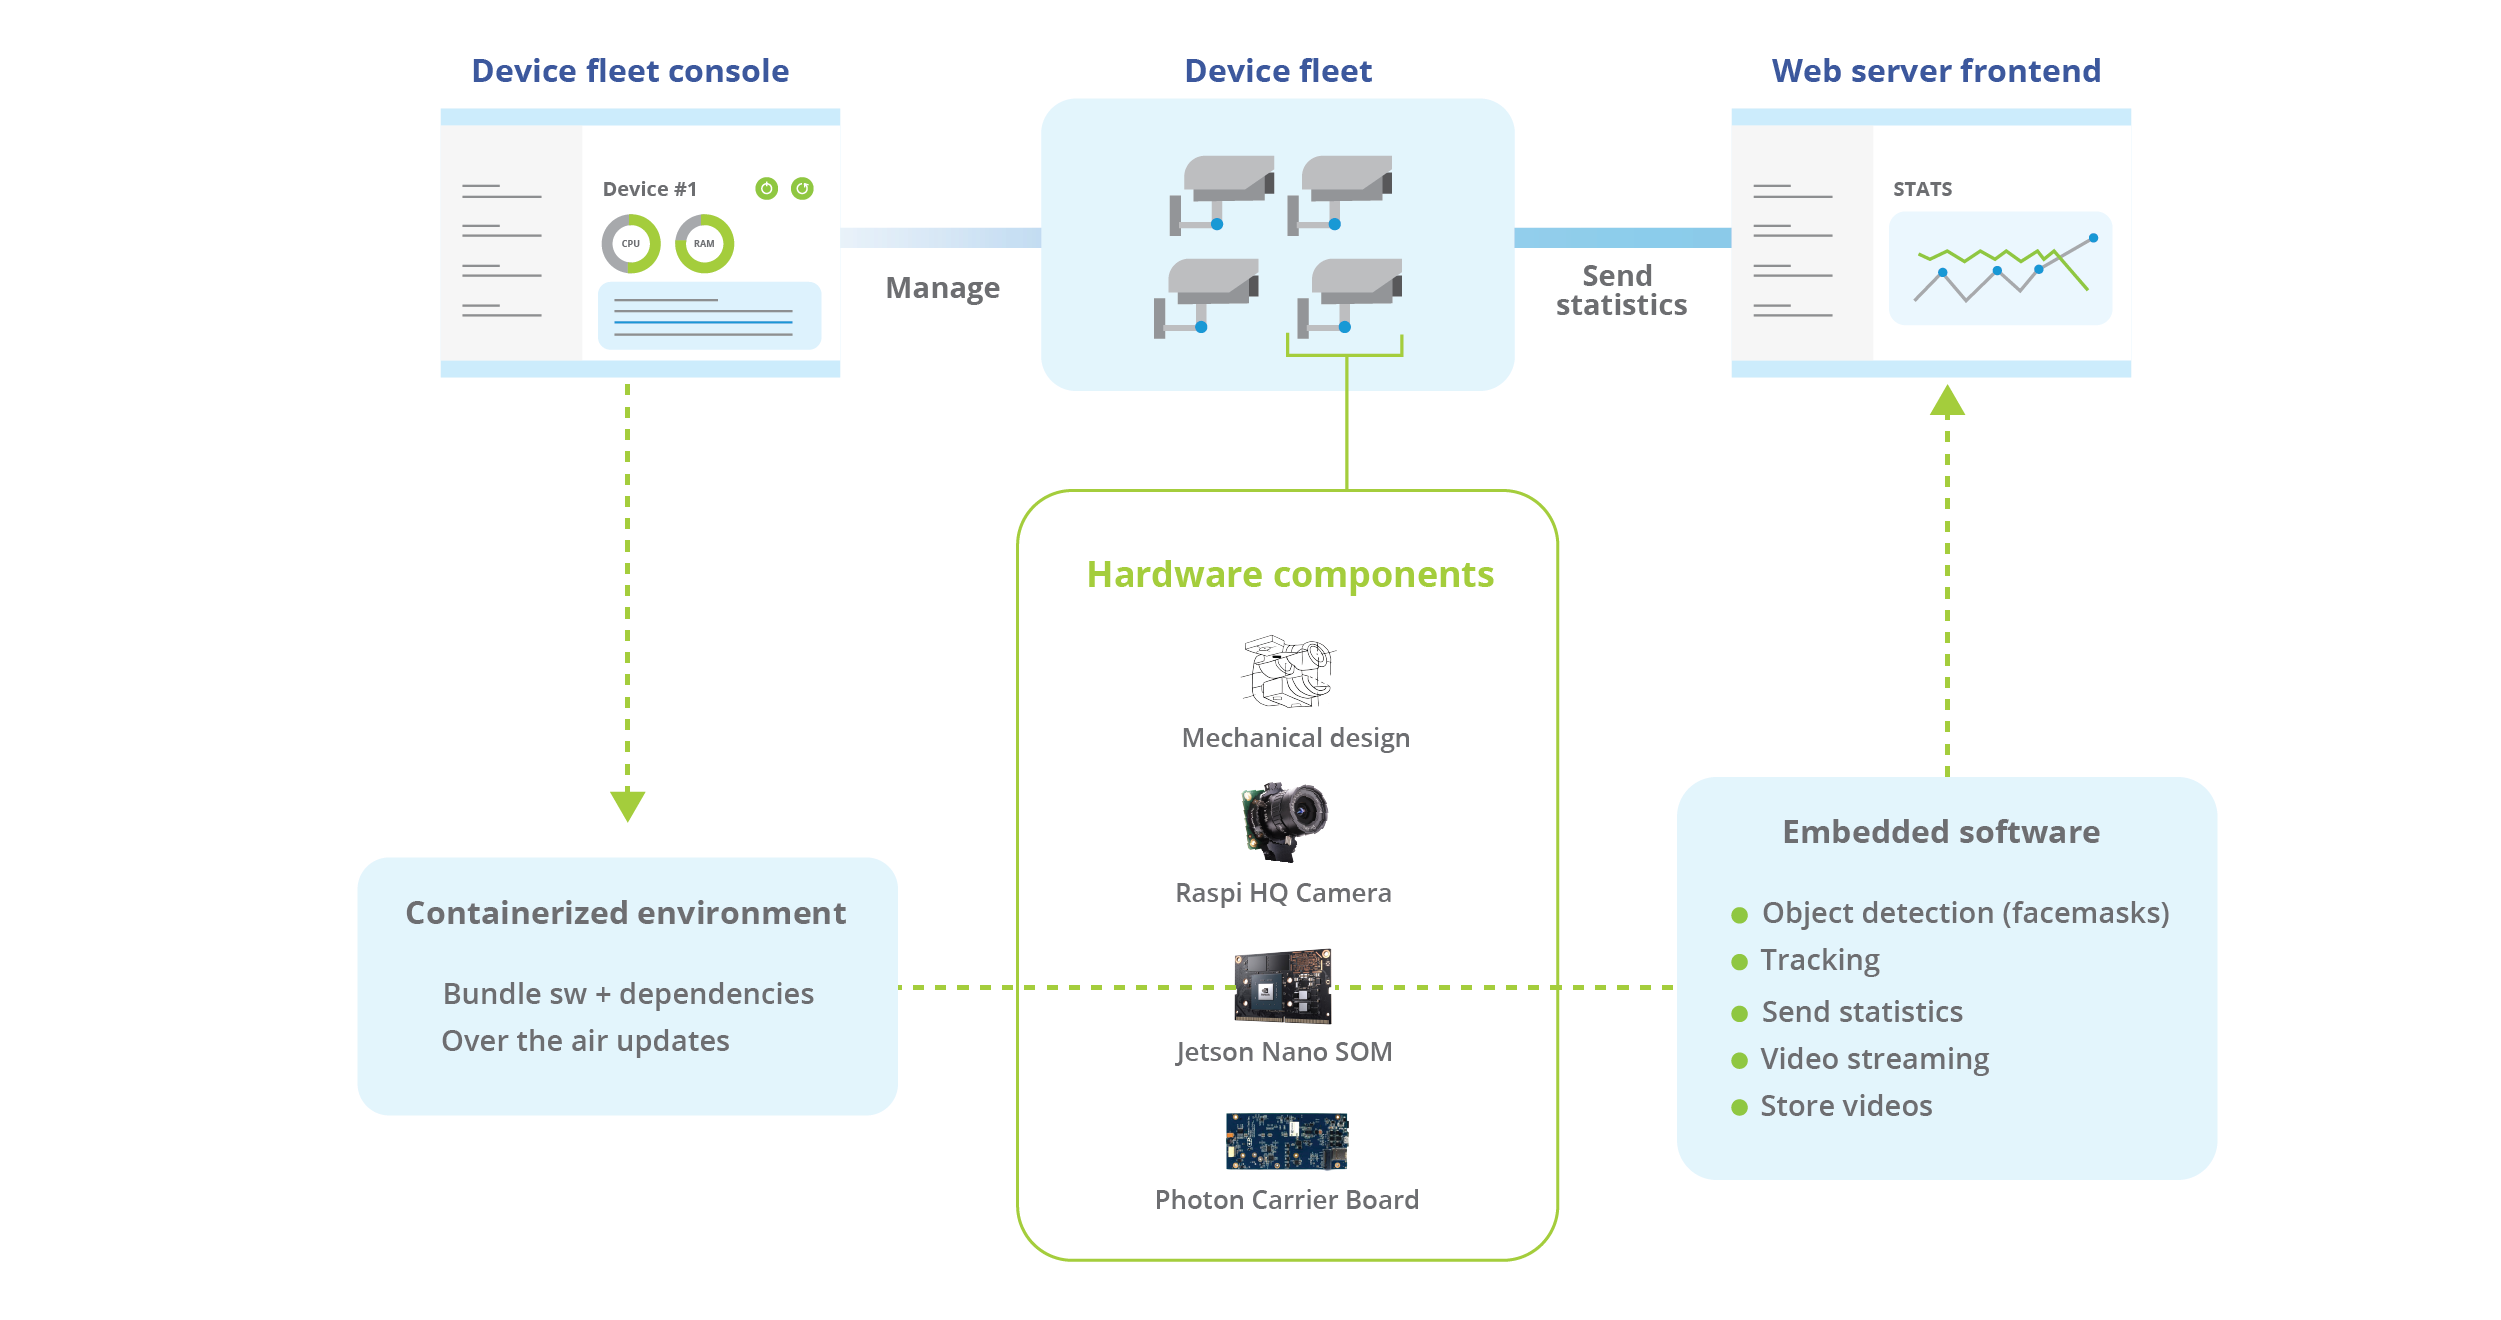
To approach a problem like this, we needed to concentrate our energies on solving the hardware, software, bundling, and deployment problems in parallel and integrating them. A general overview of the components we used is shown in the following diagram. Don't worry about understanding it entirely at first — we'll explain it in more detail later.

Hardware components
The main challenge for a product like this is finding a piece of hardware that can satisfy the requirements of the AI application. We want a small and cheap computer that can run object detection models in real-time. Generally, this means embedded hardware with resource constraints.
However, as we will soon see, this piece is only part of a larger system in which every piece needs to be selected with care.
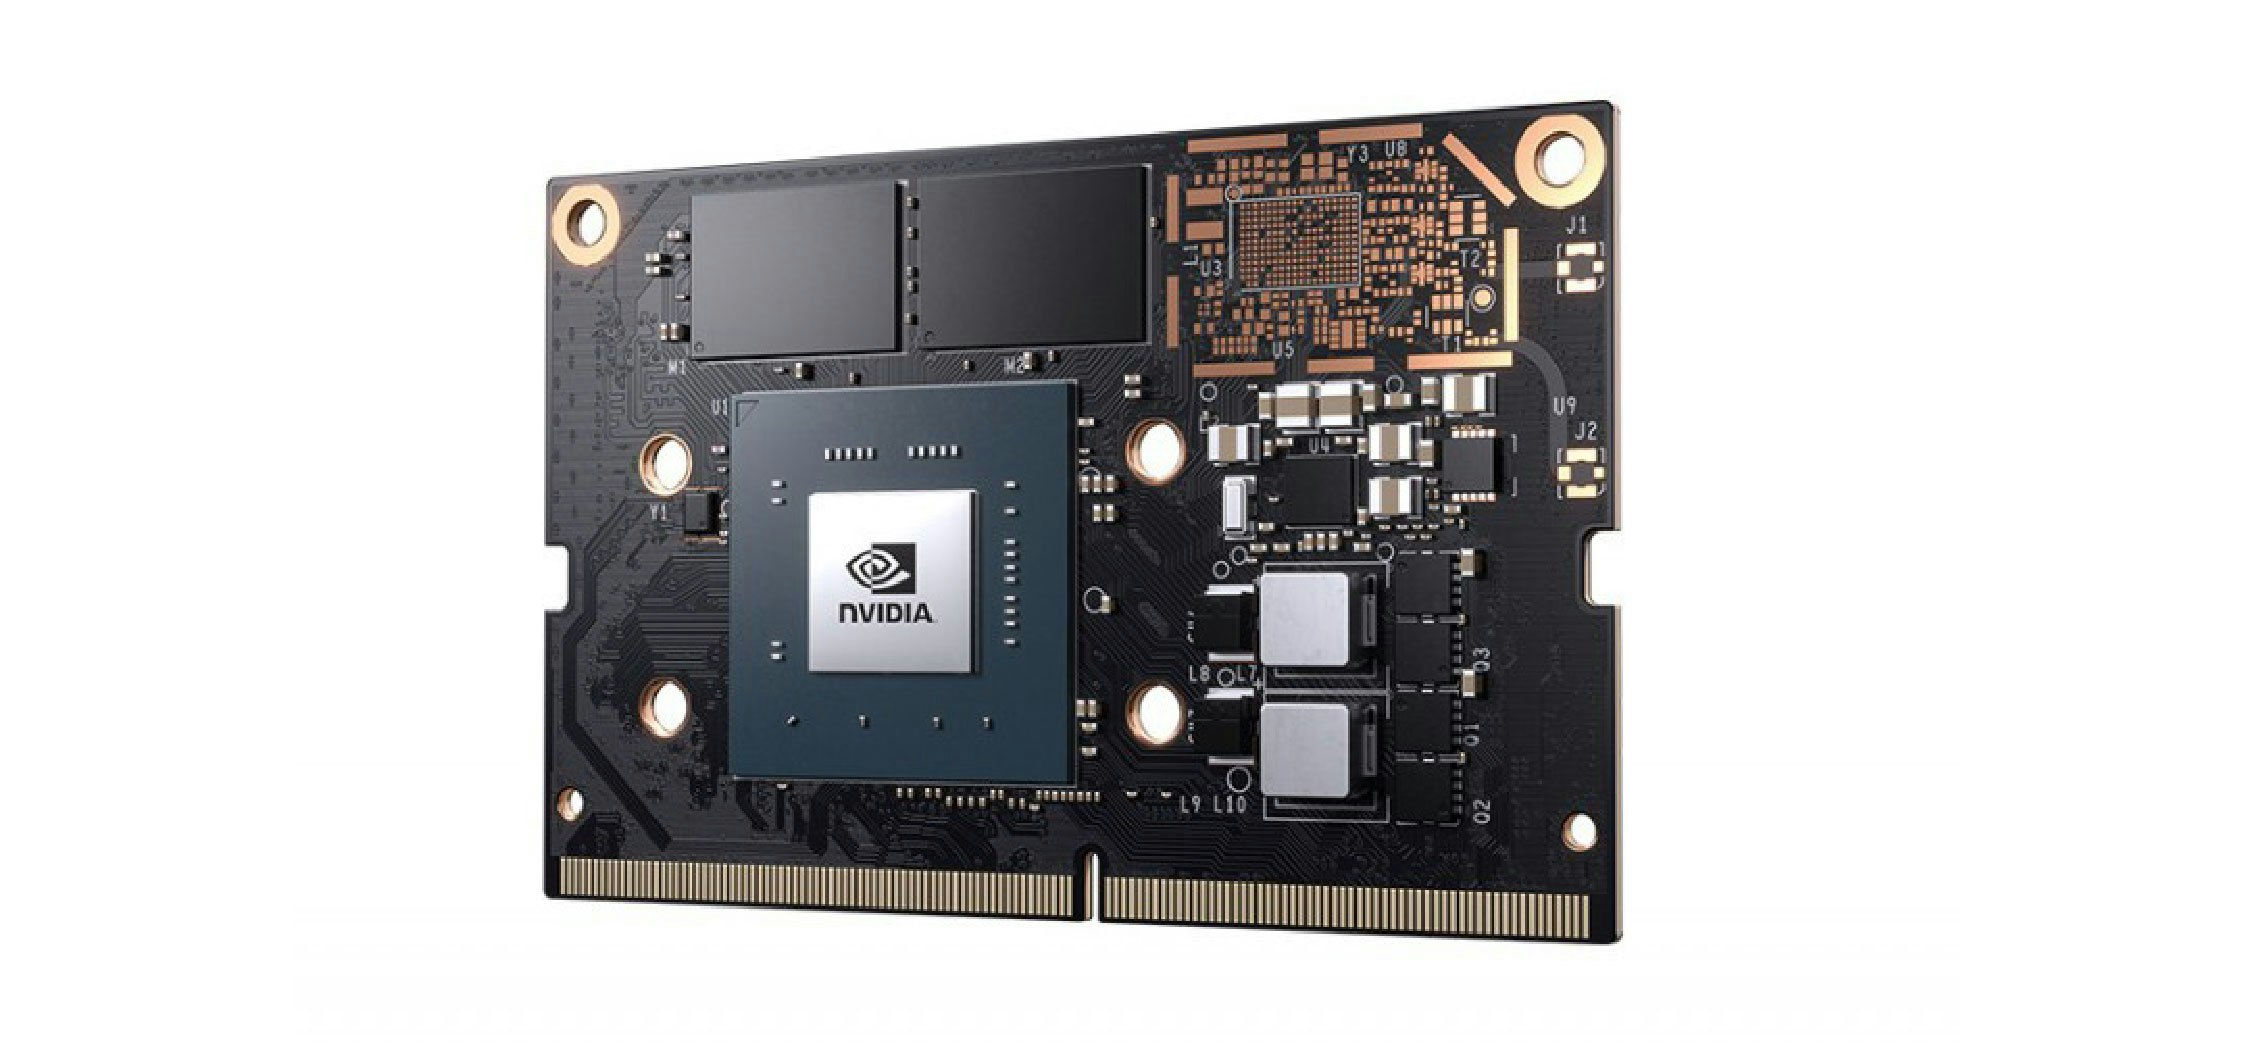
The brain: Jetson Nano
Our solution is built around the NVIDIA Jetson Nano SOM (system-on-module), which somehow manages to fit a CPU, GPU, RAM, and flash memory into a board a bit smaller than a credit card, and costs USD 99 or less for mass production.

Now, if you think about the large heatsinks and several fans that a desktop GPU needs to dissipate all the consumed power (and consequent heat), you might be wondering how that translates here. After all, we're saying that this super-powered credit card contains most of the equivalent components that you'd find in your typical desktop setup, but is somehow way cheaper, smaller, and consumes less energy.
First of all, let's not give raise to a new conspiracy theory about how desktop GPUs are a scam (we have many of those here at Tryolabs and we love them almost as much as we love our dinos and mannequins), and make it clear that this device doesn't have nearly the same computing power in comparison. Even so, the performance/cost balance is surprisingly good, and according to our benchmark, the best in class. Therefore, these devices are not here to substitute desktop GPUs but instead enable all sorts of applications that were not even possible a couple of years ago — unless you wanted a smart camera that is the size of a washing machine.
Now that we've refreshed the right expectations about what this system-on-module is for, let's mention a couple of things we need to add because they're not included:
- A camera device (sensor).
- A carrier board to provide connectors for power supply, HDMI monitor, Ethernet, and optionally a Wi-Fi or LTE module, SD card slot, USB ports.
- A way to dissipate heat, depending on how much power your application will use. In our case, we're squeezing the GPU power so we'll use an active heat sink (a.k.a. a fan).
The eyes: camera module
We decided to use the Raspberry Pi High-Quality Camera. It’s built around the IMX477 image sensor, which supports 4032x3040 resolution at 30 FPS and 1920x1080 resolution at 60 FPS. Its price point of USD 75 provides a good price/performance balance, and it has wide community support due to its popularity.
There were cheaper camera options (around USD 29) officially supported on the Jetson Nano, but after some testing in the real world, we were unhappy with their image quality.
The foundation: carrier board
Usually, the Jetson Nano Developer Kit is the first option during development (note that the credit-card-sized SOM module we talked about is plugged there, below the heatsink). NVIDIA offers it at a promotional price, the whole kit costs the same USD 99 as the single SOM module, but it's not intended for commercial use on a product.
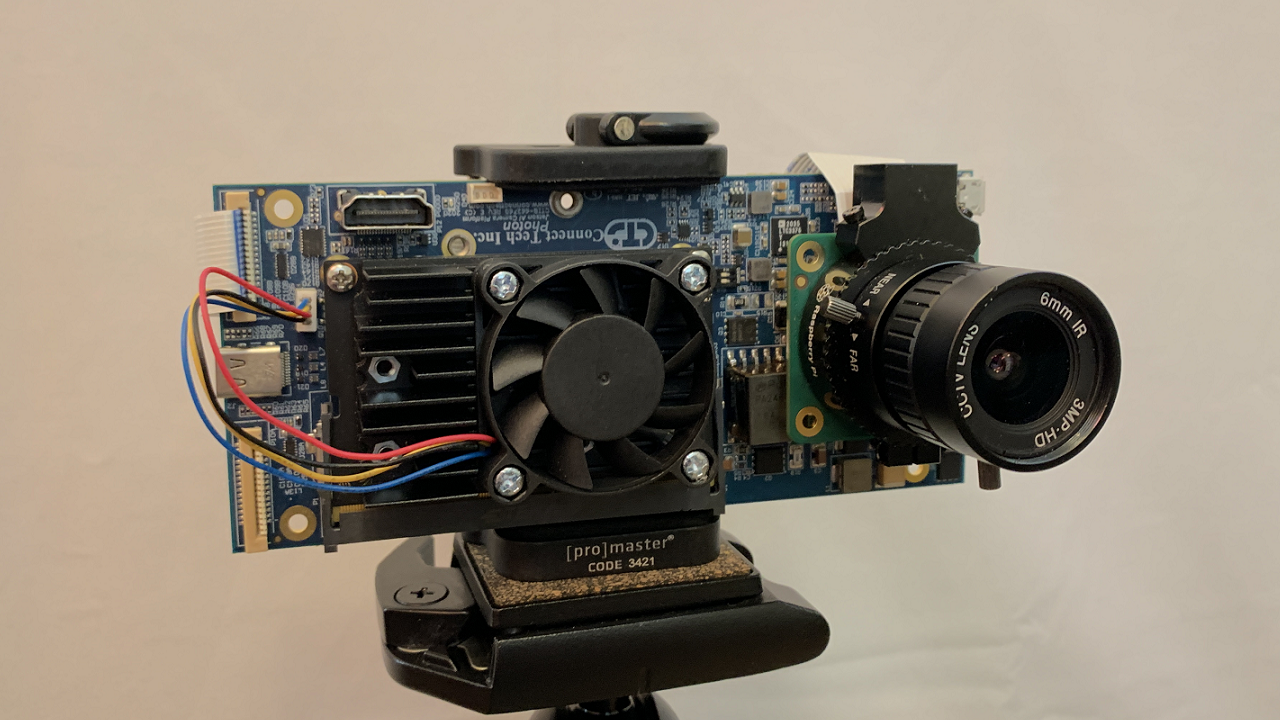
For high-volume production, the project budget would probably include designing a custom board that covers specific needs and uses only the required components, lowering the final unit cost. However, for cases like ours, it makes more sense to use an off-the-shelf carrier board, which is easy to find using NVIDIA’s Jetson Partner Hardware Products page. We selected the Connect Tech Inc. (CTI) Photon, which costs USD 351 per unit, met our design requirements, and had all the hardware interfaces needed for our application.
The following image shows this carrier board, with the mentioned camera module and the Photon Nano SOM, which is barely visible since it's below the fan and heatsink.

Considerations when changing the carrier board
We used both the devkit and then the CTI Photon carrier board (which is the actual board where our product will run, as mentioned before). It's important to note that even though the underlying system-on-module is the same Jetson Nano, several drivers depend on devices that are on the carrier board. Hence, the manufacturers usually provide a BSP (board support package) with the drivers and configurations. These can be setup in different ways, like using a Linux image that is provided by the manufacturer, running an installation script on a supported Linux image, or adding layers to build your custom version of the OS (see Yocto).
In our case, we had some trouble with the camera and support for the Wi-Fi modules when running a new OS version on the CTI Photon carrier board, but we received great support from the developers and got both modules working after some tweaks.
The important takeaway here is: don't wait too much before you make sure that all your hardware works with the actual version of the OS that you'll use. These things usually take some time, and you might depend on the manufacturer's support to provide at least a couple of replies to your questions, or even a software update in some cases.
Keeping it cool: thermal considerations
People often forget about one crucial limit that is found when making things smaller: you need to release the heat, or your device will burn — literally. From the perspective of the hard-boiled first law of thermodynamics, computation or logical reasoning might just be a byproduct we get when converting electricity into heat. Therefore, think of any digital component with no moving parts as an electric stove.
Now, this sophisticated electrical stove is designed to limit its temperature, and it's so smart that it will degrade its own performance when it reaches 97°C (206.6°F). This causes a reduction in power consumption and therefore heat generation, in a mechanism called thermal throttling.
We ran some tests (see the plots below), using both a passive and an active heatsink (i.e., with a little fan added on top of it). And we found that our device was in fact throttling after running our software for 15 straight minutes with the passive option (which was no surprise because as we mentioned, we're making full usage of the CPU and GPU capacity), dropping the FPS of the entire video processing pipeline.

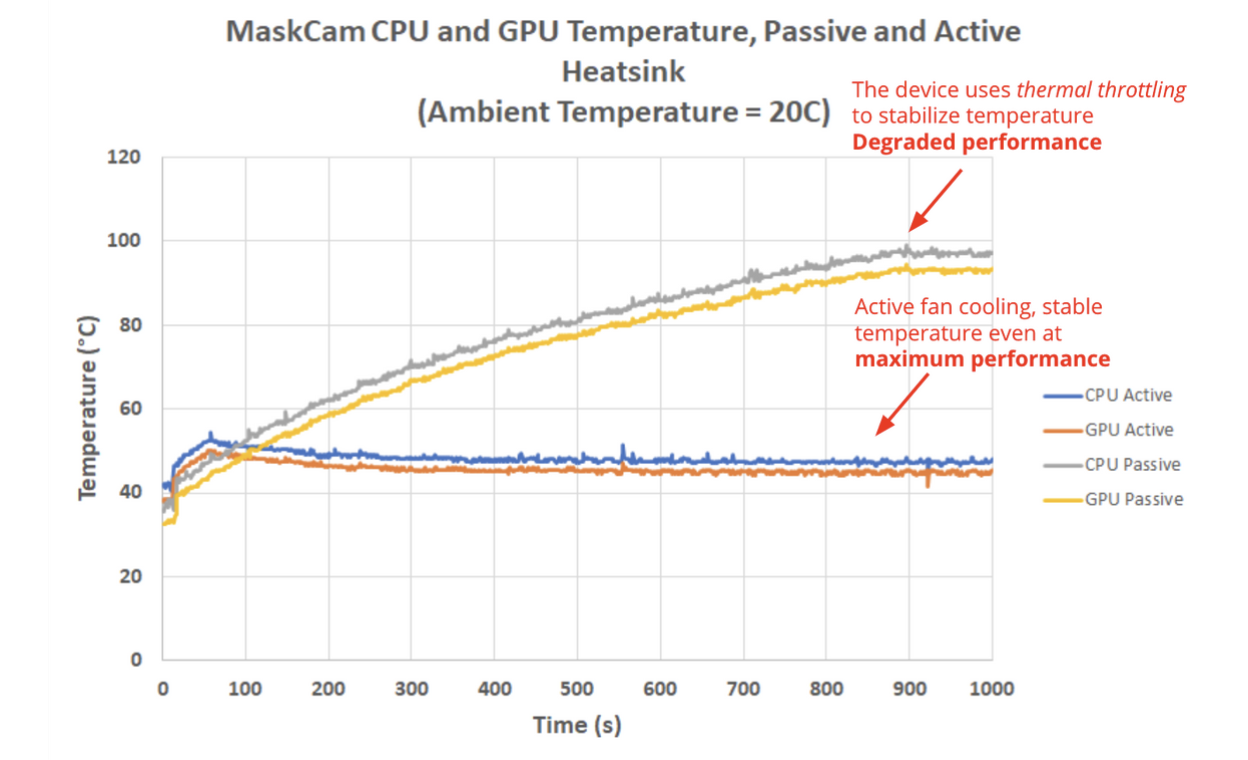
Then we decided to use an active heatsink on our device, which keeps the temperature below 50°C (122°F) as shown in the plots. Consequently, thermal throttling is never activated and the device can run our software at maximum performance, forever (or one would hope).
Software stack
Modeling and optimizations
We've come a long way after the first version of our face mask detector. Back then, we used two deep learning models, one for pose estimation (to extract the faces) and another one for image classification (to determine what faces had a mask). The consequence was that it performed well, but was not fast enough.
The first optimization was to transform the pipeline to run a single object detection model to find the face bounding boxes and determine if they have a mask or not, in one shot. In our experience, pose estimation was very robust to detecting people whose face was not clearly visible, which improves the tracking accuracy. Still, at least now we could compare both approaches and better understand the compromise.
To track people's trajectories, we use our open-source tracking library Norfair like we were doing on our previous approach. In order to collect the mask compliance statistics, we also need to detect people when they're not looking straight to the camera, so our object classes are mask, no_mask, not_visible and misplaced.
The fourth category is optional and aims to label more accurately faces with a mask on, but it's not properly positioned, covering both nose and mouth. Samples for this class are harder to find, so the accuracy is not as good as the other classes. Because of this, we're being pragmatic and just counting it together with no_mask for now.

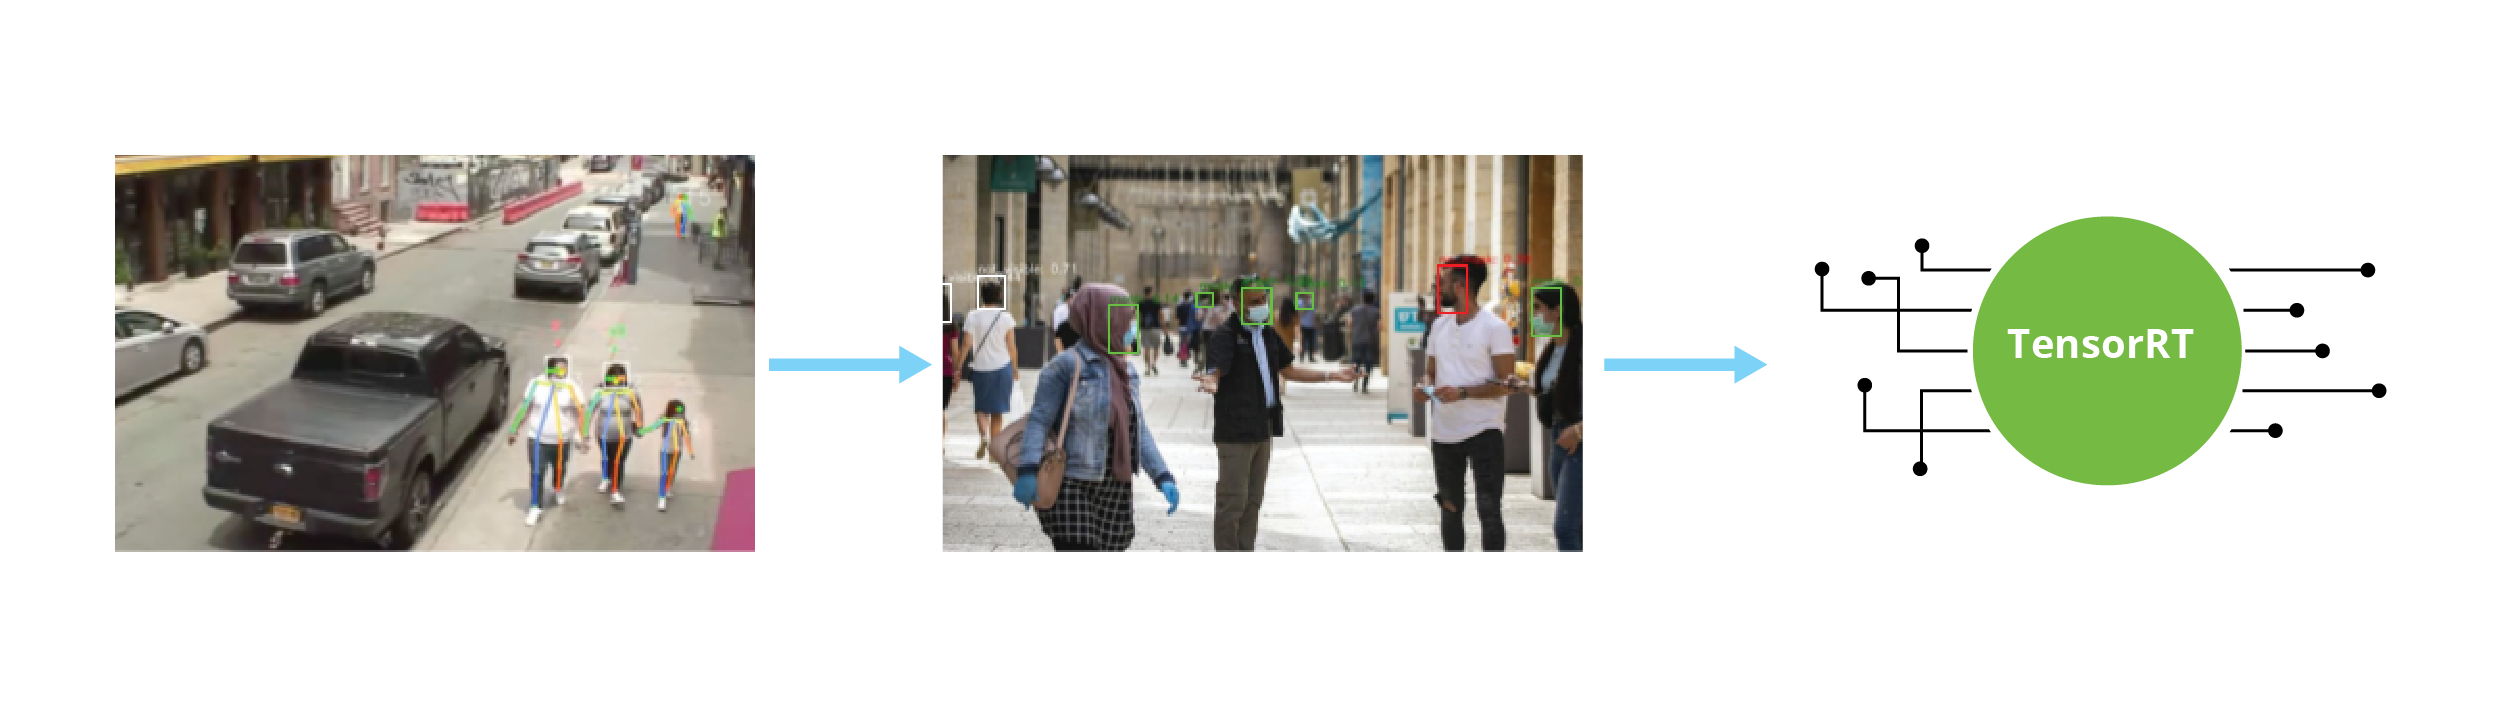
After an object detection model, we need to make it run at full potential in our resource-constrained device by performing another step: converting it to an optimized format for the particular hardware. In the case of NVIDIA products, this means creating a TensorRT engine and adapting the model weights to the proper format. Particularly for the Jetson Nano, the best weight format is 16-bit floating-point numbers (there's no performance gain using smaller 8-bit integers like in other platforms).
We compared different object detection models: MobileNetV2, YOLOv4. The latter has both a regular size model (which we'll call full) and a tiny variant that sacrifices some accuracy for faster speed and smaller size. We trained these three models with different input resolutions, then optimized using TensorRT and benchmarked on the same reference videos. Check some of the results in the next table.
| Cluster | YOLOv4-full | YOLOv4-tiny | MobileNetV2 |
|---|---|---|---|
| Input resolution | 608x608 | 1024x608 | 1024x608 |
| FPS (Jetson Nano) | 2.5 | 14 | 6 |
Of course, we also considered the accuracy of each of these models. Not surprisingly, the best detections were by far obtained with the YOLOv4-full model, even at a smaller resolution. However, the resulting frame rate is too small for a real-time application. It's not even possible to use a tracker to interpolate detections between inference frames, because the trajectories aren't smooth enough (consecutive detections of the same moving object can get too far away between subsequent frames).
Now, the detections were of similar quality between YOLOv4-tiny and MobileNetV2, but the former is more than twice as fast, so we can run inference more often resulting in better results over the whole video sequence (the tracker needs to interpolate over smaller intervals!).
In the final iterations of the project, we also tested DetectNet, a neural network architecture provided by NVIDIA to use as a reference on their platforms, but we couldn't find a good combination of hyperparameters to produce better detections than what we had.
The dataset
We found no existing open dataset with the four classes mentioned before. Therefore, we had to start by labeling one entirely from scratch. This first version consisted of 350 images with 6800 labels between the four classes.
We then merged this dataset with another one that NVIDIA used on a similar project, and after fixing and adding missing labels, we ended up with a dataset with 5223 images, containing 7008 mask labels, 7866 no_mask, 3678 not_visible, and 74 misplaced.
This resulted in a better model in general, which is notably more accurate at identifying mask and no_mask faces, but is slightly worse at detecting not_visible faces since that class is not balanced in comparison. But this is a reasonable compromise for our case, as squeezing all the possible accuracy gains (via creation of a larger dataset) was not the focus.
Making it fast using Deepstream
We need fast prototyping and iteration with different state-of-the-art models during the initial phases of research and development. Here, we tend to prioritize developer friendliness by using the OpenCV API on Python, which is quite simple and integrated with data science tools like NumPy. You can just take any image or video frame and use it in Python as any other matrix: manipulate pixels, crop, draw on top of it, etc. and save the result as a video or visualize it in a Jupyter Notebook, for example.
However, when you're trying to make the most of your GPU and CPU, using OpenCV requires manual creation of a well-designed multi-threading architecture so that, for example, disk-writing, post-processing (usually CPU), and inference (hopefully GPU) are executed in parallel (since they use completely different resources), and also to ensure that the data is not moved back and forth in the GPU memory space unnecessarily.
This is where DeepStream and GStreamer enter the stage. GStreamer is an open-source multimedia framework that has been around for over 20 years now and enables the creation of pipelines to process almost any stream you can think of (e.g. audio and video). After being set-up, it handles complex tasks automatically, from frame enqueueing to latency compensation, executing at the same time the pipeline elements that can be parallelized. This is in general achieved out of the box, but it can be further refined with some expertise on queues and signaling.
DeepStream is a set of plugins for GStreamer, which are designed to run accelerated on NVIDIA GPUs. So you have hardware accelerated plugins to put into a GStreamer pipeline for video decoding/encoding, frame manipulation (like resizing, format changes, etc), drawing, and of course: run inference from deep learning models, like our object detector.

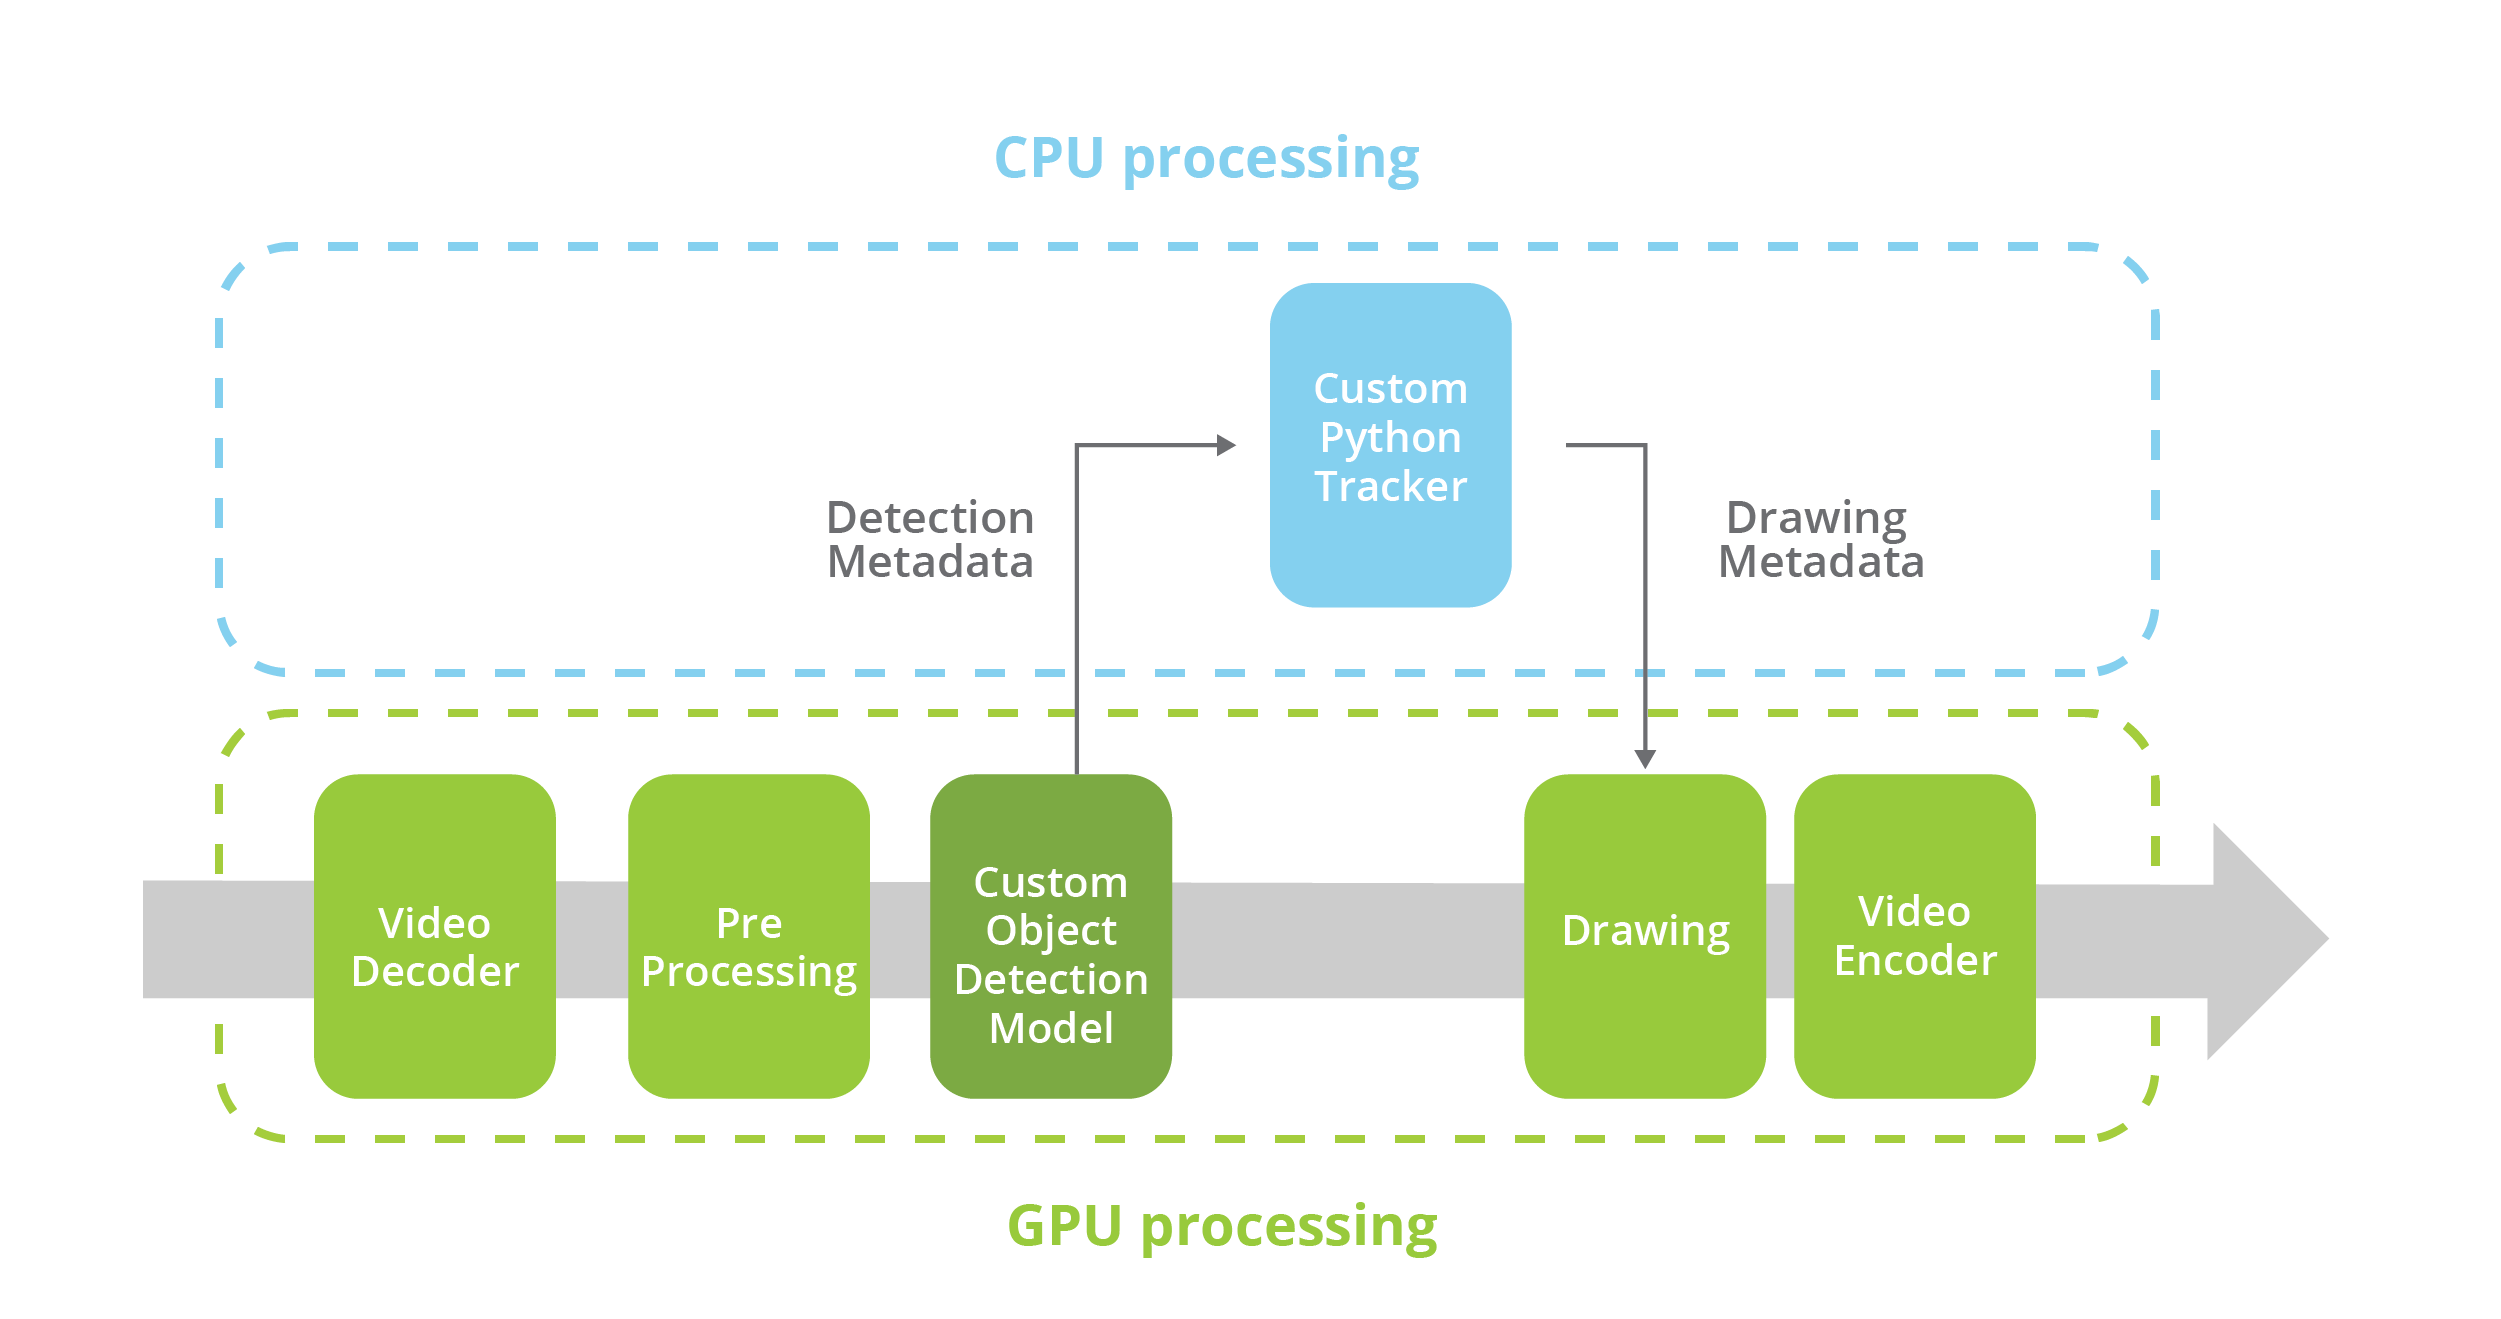
There was a challenge to adapt our case to run as a DeepStream pipeline, though. All of our codebase was written in Python and GStreamer is written in C, a low-level language better suited for these tasks. However, both GStreamer itself and DeepStream plugins provide bindings for Python, with which you can create and control the pipeline and access the relevant detections through metadata information.
This way we managed to create a video pipeline where the multimedia processing tasks are entirely executed on GPU and handled by a low level and highly performant language, but actually do software development using a high-level language like Python, and even allowing us to use our existing tracking code (a Python package). After running our tracker, we can draw on the screen, not by manipulating pixels but again using metadata to tell the hardware-accelerated plugin what we want to draw. The video data flow never leaves the GPU!
In summary, our application codebase is Python, but the video processing tasks are entirely executed on a hardware-accelerated pipeline. We have the best of both worlds: low level to optimize performance, high-level language for faster development.
Multiprocessing
At this point, we have the video decoding/encoding, object detection, tracking, and drawing tasks covered in our accelerated DeepStream pipeline. But we have high expectations for our smart camera, as the requirements include:
- Report mask-usage statistics to a server.
- Enable/disable video streaming on demand.
- Save and download video fragments when a special event occurs.
- Receive commands from a web interface.
For the protocol for reporting statistics and receiving commands we chose MQTT, a standard and lightweight protocol for messaging in IoT devices.
We tried to fulfill the second and third requirements using the same DeepStream pipeline, but it turned out to be hard to get it working properly and robustly since it requires modifying the GStreamer pipeline at runtime, without interrupting the flow.
So, we decided to decouple these tasks into different processes, which can be handled independently. But to do that, we needed a way to access the video stream of the DeepStream pipeline, from the streaming and fragment-video-saving processes. For that, we used UDP sockets, a networking protocol generally used for streaming.
Finally, we needed a single process that is the entry point for all these other processes and coordinates them properly. This is what we call an Orchestrator, for obvious reasons. We'll also use that process to handle all MQTT communication with the server since it's in a good position to receive commands to restart/terminate processes, or exchange signals with them when needed. All this interaction can be better described with a diagram like shown in the next figure.
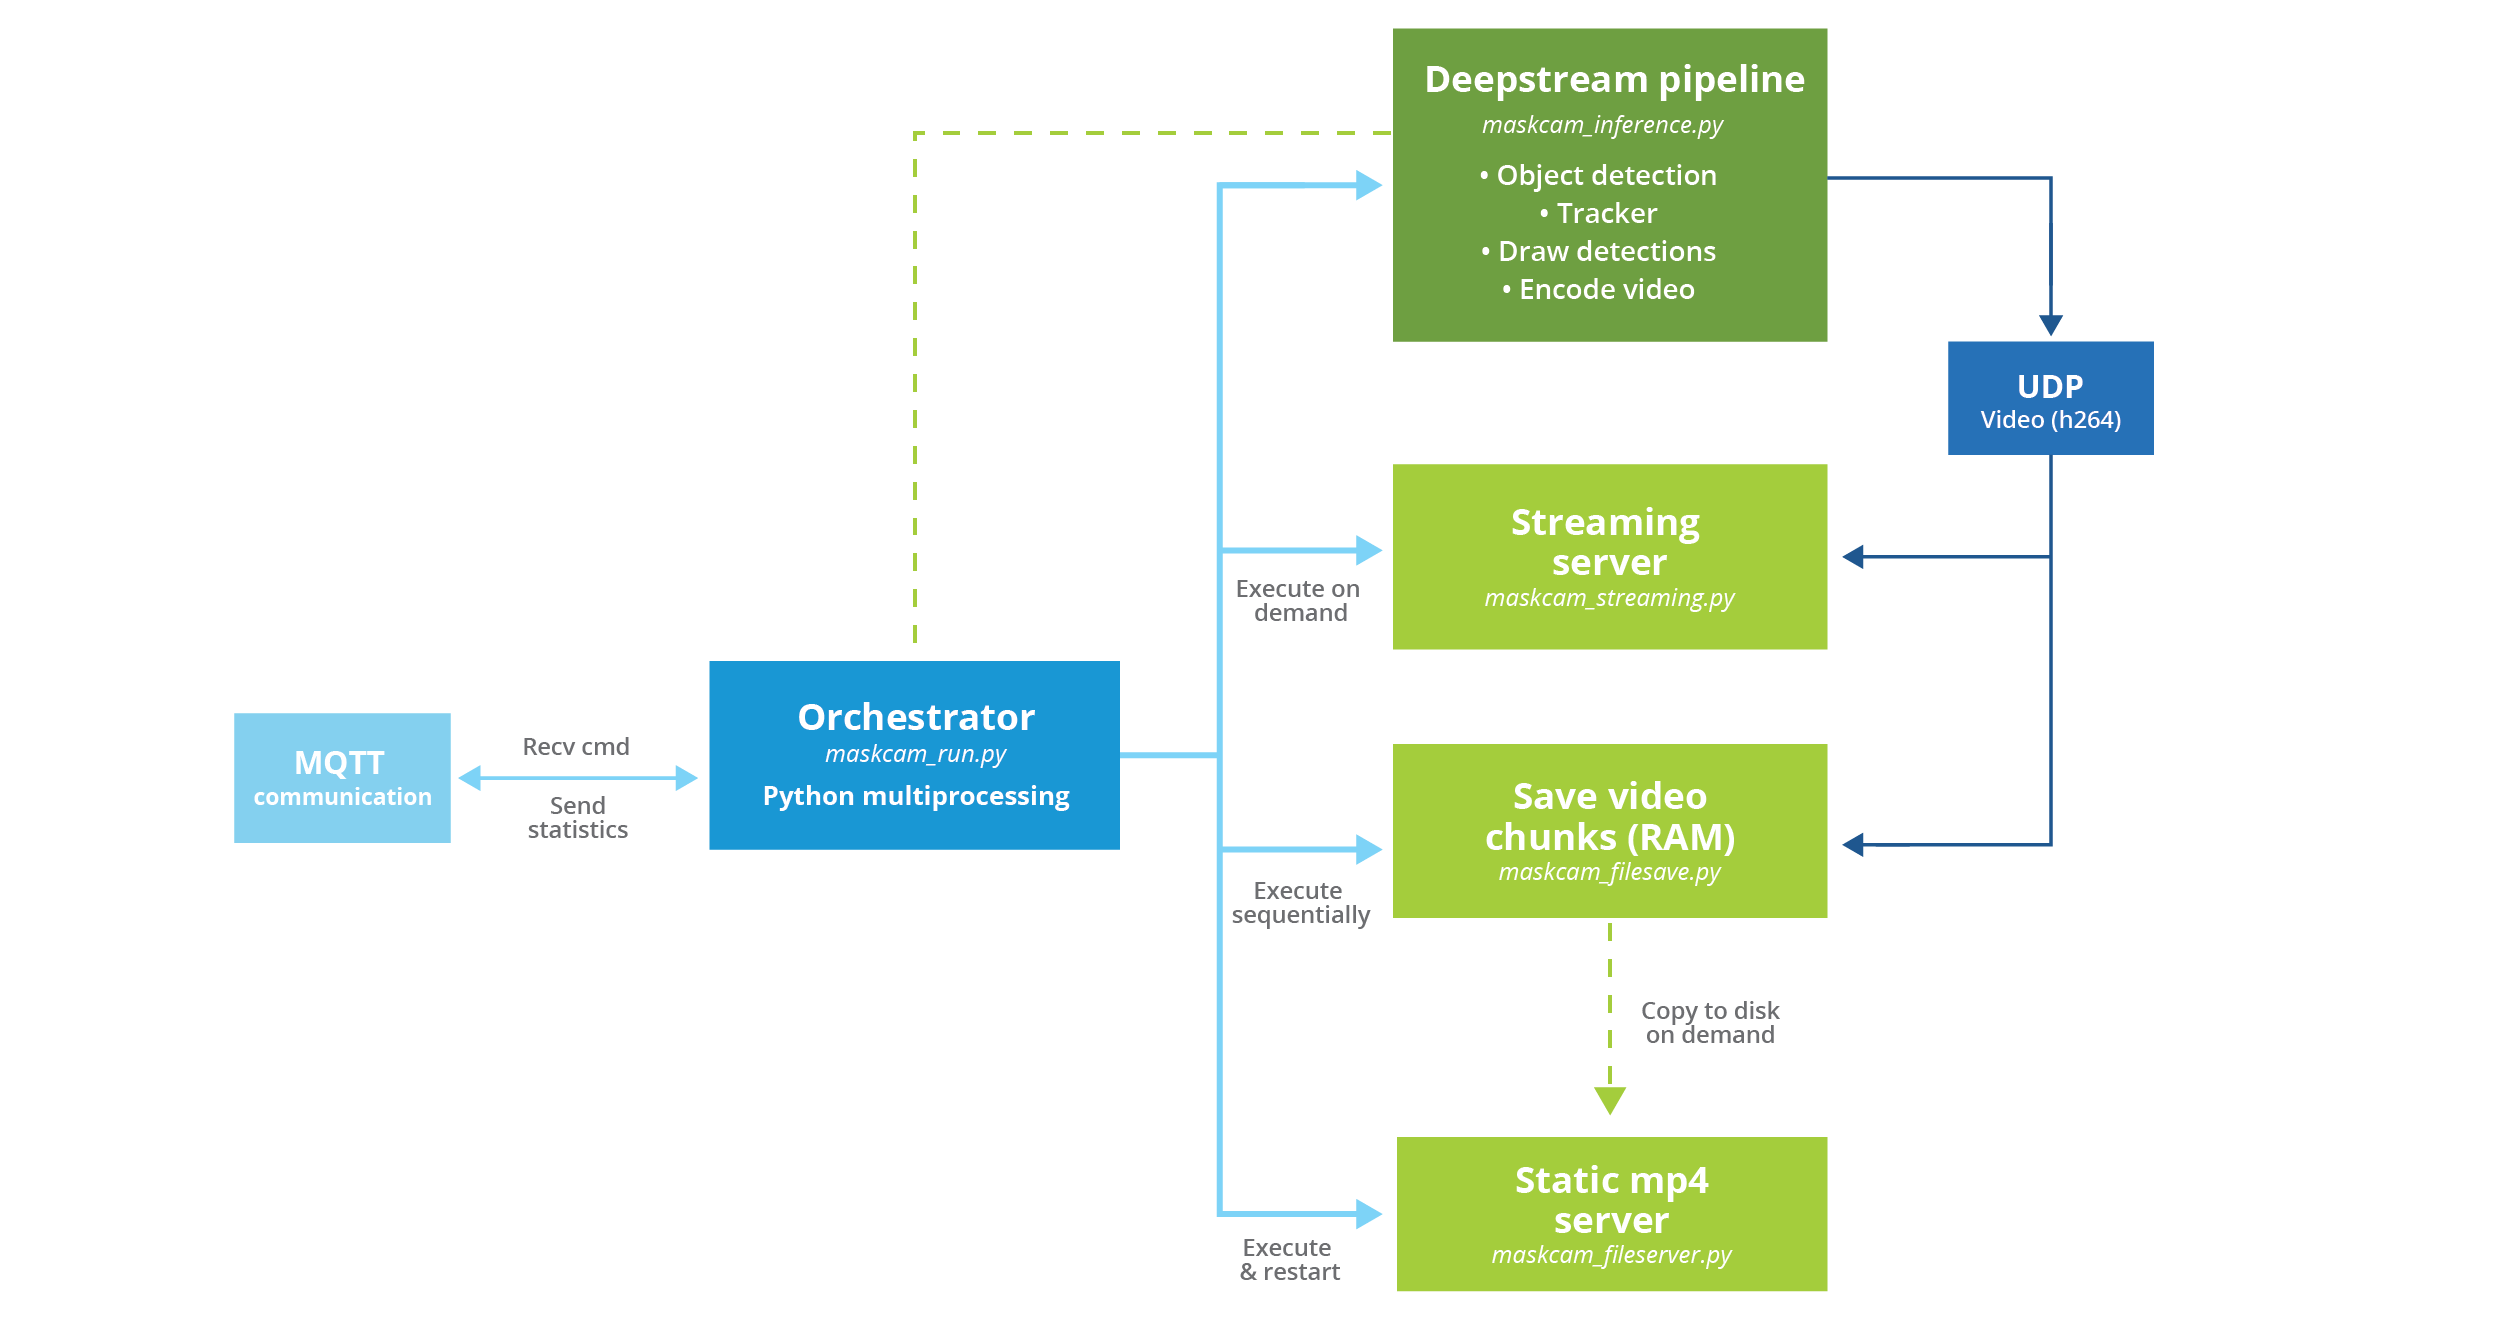
One final detail about this architecture is that all these multiple processes are handled using a Python module called (surprise surprise!): multiprocessing. Although this seems self-evident, there are other choices to implement a similar behavior. This is only the best.
Some developers might imagine that using the threading module is a good option, but that's probably because they don't know the dark truth behind something called the Python GIL. And that's all we'll say about it.
Another possible option would be to use the subprocess module, which allows running any system command from a Python script, including, of course, other Python scripts. But communication and management of these running processes are much harder and finicky.
The multiprocessing module provides an API that is equivalent to threading, only that it provides true parallelism on multi-core systems. Therefore, you can create queues and events to communicate between processes, which are straightforward to use and easy to understand.
The web control center
After getting the information out from the video, we needed a place where to store it and display it. We chose to set up an EC2 instance on AWS, but it can be the cloud provider of your choice. The tasks we needed to cover on this server were:
- Setup a MQTT broker to receive the information from the devices.
- Create a database to store the devices and statistics information.
- Configure an API to serve the database.
- Create a frontend dashboard to visualize the information.
- Send commands from the frontend to the devices when they're connected.
Having these tasks in mind, we implemented our solution using Python and Docker containers. We used one container per each task described above:
- MQTT broker: Eclipse Mosquitto.
- Database: PostgreSQL.
- Backend: Python API built with FastAPI, and an MQTT subscriber process to receive statistics and save them to the database.
- Frontend: Streamlit with another MQTT client to send commands/receive device status.
The assemble between containers is the following:


When a new message gets to the MQTT broker, the MQTT subscriber process reads the information from the broker and saves it to the database. Then, the API serves that information to the Streamlit application that displays the statistics from each device.
The statistics and the list of devices are persistent and can be shown even when the devices are offline. But when the devices are online, the frontend can also communicate directly with the MQTT broker to send commands to the device, and receive their current status.
The frontend also facilitates two direct links to the device, to access their streaming address (only when streaming is enabled), and the list of downloadable mp4 video files which were flagged as relevant for some reason and saved to disk.
As we already mentioned, even though the MQTT broker, the database, backend API, and the Streamlit App could be separate servers by themselves, they all run on a single physical instance by using containers under a Docker Compose environment, which is easy to set up locally or on a cloud instance.
Code packaging and containerization
This section refers to the code packaging for the software that runs on the embedded device. It's still a Docker container, but not the same that we used for the server-side software, and it runs under a special NVIDIA runtime that allows access to the GPU drivers and all the embedded device peripherals.
For embedded developers, it's usually counter-intuitive to use containers on their tiny devices, since they tend to think that the performance will be negatively affected. That's just not true for the Jetson Nano, at least in terms of CPU and GPU performance. It's true that the container runtime does consume some RAM though, but if the model and the rest of the software fit on the device under a container, using them is a great idea.
In our case, we used containers for many reasons:
- Easy distribution and deployment of the software package, bundled together with its dependencies. You don't need to worry about installing the exact same versions of each system package (e.g: DeepStream, CUDA libraries) and Python library, or even the OS. Download the image, run the container with access to NVIDIA drivers and the camera device, and you got MaskCam running.
- Better reproducibility. With many people running the software on different devices, it would be really painful if you need to set up every possible combination of versions that they might be using to reproduce a bug that you're chasing.
- Decoupling from specific hardware. After building the Docker image, you only need a minimal host OS layer with a couple of drivers to get the container running. Otherwise, provisioning the host OS could get tricky when using different devices from various manufacturers and base images. Imagine you want to test a Jetson NX, a Jetson TX2, a Photon Nano carrier board, aside from the devkit. Each of these platforms provides its base OS image, and you'd need to make sure you find out how to install all dependencies with compatible versions on each of them.
- Easy over-the-air (OTA) updates. In a production system, you'd need a way to update the software on the device, ideally over the air with minimal effort and data transfer. That's what you get when using the container layers properly, which means understanding how caching works and having a lightweight layer that contains all your source code. You're just one
docker pullaway from getting your devices updated when you push a new version of the code.
Another advantage of a containerized solution is that you can easily integrate it with a fleet-management platform, like balenaCloud. This platform allows creating a free account with up to 10 devices, so it was perfect for trying it on our project and seeing how it would work in a real production scenario.
You download a very lightweight balenaOS on your device (which comes with NVIDIA drivers but you could further customize by building from source, using the Yocto framework). This OS will automatically connect to your Balena VPN and Dashboard if you created an App and downloaded the image from there. This also means that your device runs in a secure network environment. The usefulness of having this dashboard is better explained with an image:
The assemble between containers is the following:

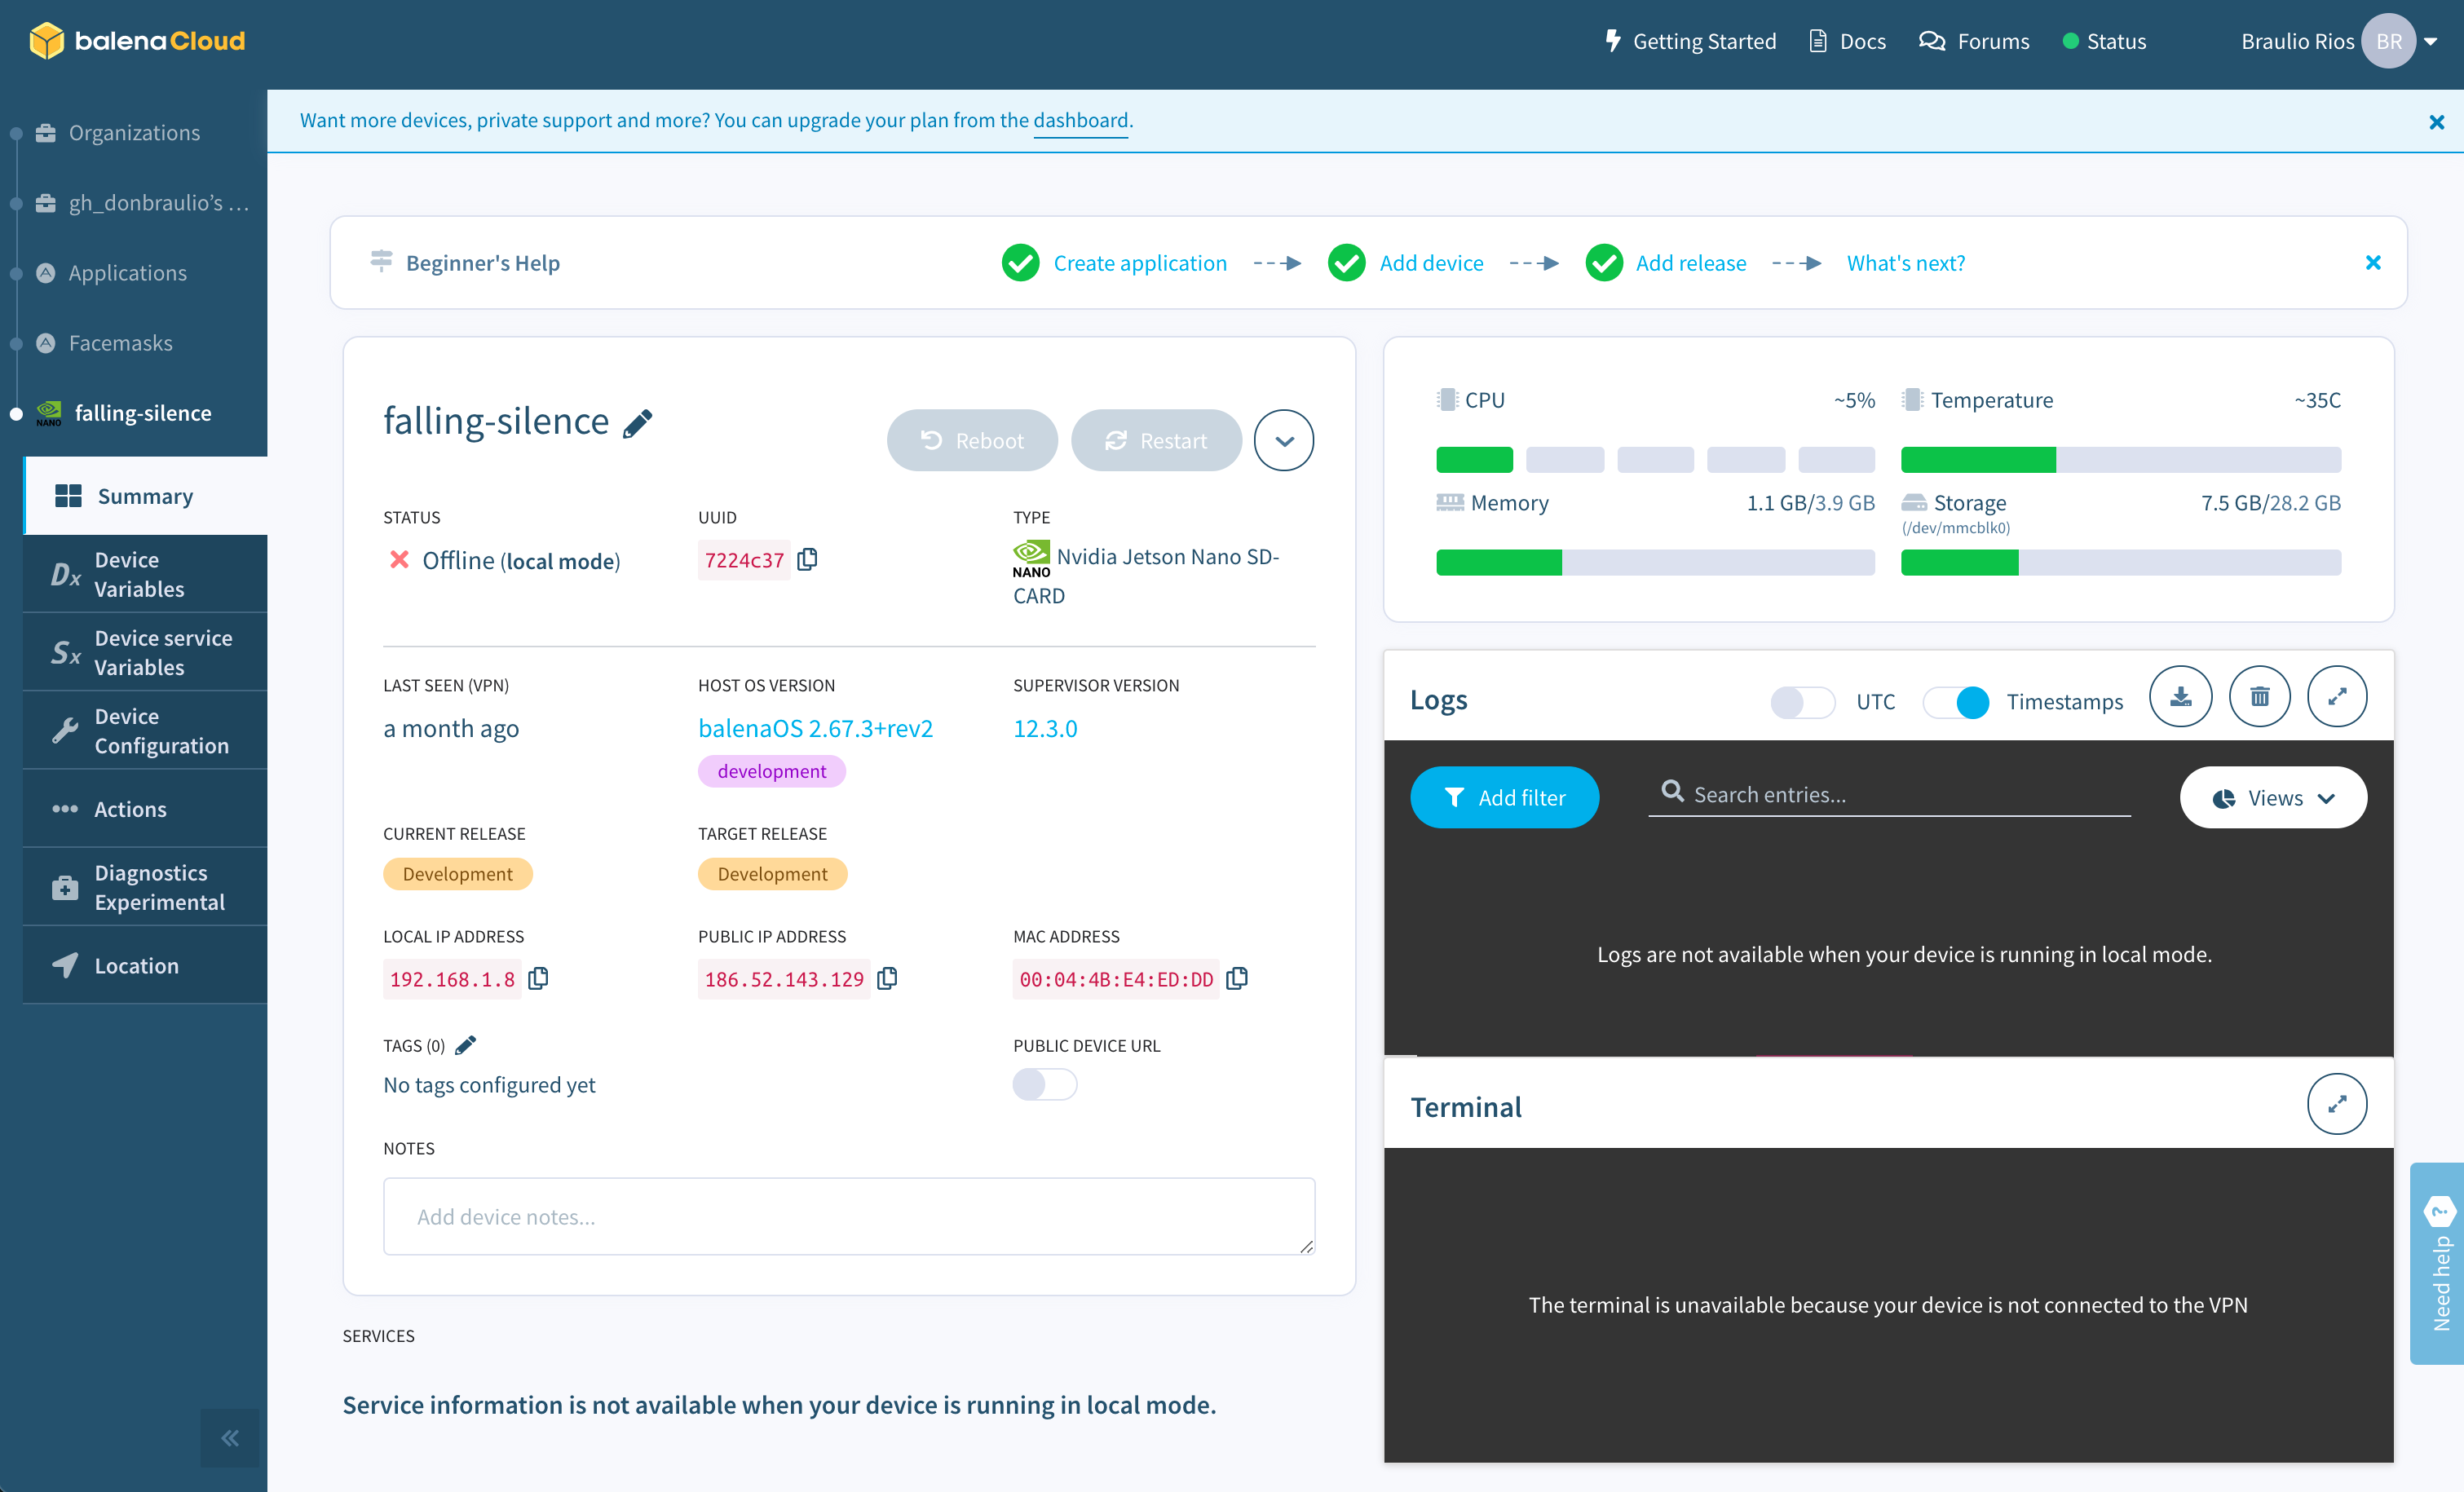
From this dashboard, you can do all the management tasks you'd need on all your devices, like resetting, restarting services, updating, configuring the device through Environment Variables, and accessing the logs or even an SSH console for debugging.
In our experience, it was straightforward and intuitive to use, and when things got complicated trying to load some camera drivers on our Photon carrier board, we got surprisingly fast responses to our questions on the corresponding GitHub repo!
How it all looks like: the demo!
Conclusions
During the three months duration of this project, we learned tons of things and built a mask detection smart camera on an edge device that works. Of course, we faced some difficulties along the way, mostly related to finding information on the official documentation of the tools we used and when moving from one platform to another. However, we were able to sort things out thanks to NVIDIA's support resources (software samples, documentation, forums), and the help provided by its partners (namely, ConnectTech and Balena). In the end, we were surprised by how fast we could prototype and design this product end-to-end!
What we built is intended to be a reference design for other smart-camera applications with computer vision and deep learning requirements. As such, it's open-source and there's a lot of room for improvement. For example, you could try training and adapting other object detection models and let us know if they're better than ours!
Also, don't hesitate to create an issue or a pull request with your contributions. And please let us know if you have a business opportunity to work with us, adapting this system for another use case.
We would like to finish by remarking that we really enjoyed working alongside BDTI, NVIDIA, and Jabil on this collaboration. Kudos to them for their amazing teams!
Available resources
This is an open-source project, so if you want to see it in action you only have to download the code and run it. All you need is a Jetson Nano dev kit, and a USB web cam. If you would like dig even further and know all the nitty gritty details, you can read the accompanying whitepaper that we published as part of the project.
We know that embracing a project like this takes time, resources, and a lot of work. We've been there, so don't hesitate to ask us any question you have, we're here to help you.


Wondering how AI can help you?

© 2025. All rights reserved.