

The guide to fine-tuning Stable Diffusion with your own images


Have you ever wished you were able to try out a new hairstyle before finally committing to it? How about fulfilling your childhood dream of being a superhero? Maybe having your own digital Funko Pop to use as your profile picture? All of these are possible with DreamBooth, a new tool developed by researchers at Google that takes recent progress in text-conditional image synthesis to the next level.
In our previous post, we discussed text-to-image generation models and the massive impact that models like DALL·E and Stable Diffusion are having throughout the Machine Learning community.
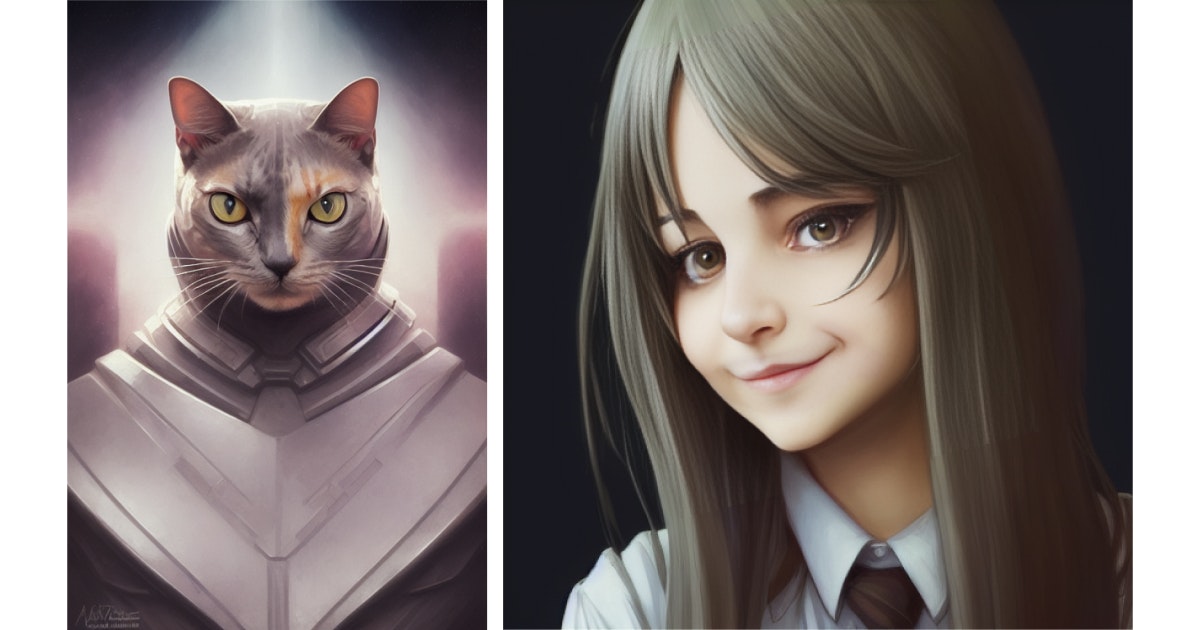
Now, in this blog post, we will guide you through implementing DreamBooth so that you can generate images like the ones you see below. To do so, we’ll implant ourselves into a pre-trained Stable Diffusion model’s vocabulary. Be warned, generating images of yourself (or your friends) is highly addictive. Don’t say we didn’t warn you!
Also, if you know part of our team, you may recognize some faces in the following images. 👀


DreamBooth motivation
Feel free to skip this section if you’re not particularly interested in the theory behind the approach and prefer to dive straight into the implementation.
The first step towards creating images of ourselves using DreamBooth is to teach the model how we look. To do so, we’ll follow a special procedure to implant ourselves into the output space of an already trained image synthesis model.
You may be wondering why we need to follow such a special procedure. After all, these new generation image synthesis models have unprecedented expressive power. Can’t we just feed the model an extremely detailed description of the person and be done with it? The short answer is no. It’s still very hard for these models to reconstruct the key visual features that characterize a specific person. Instead, the model must learn what we look like down to the last detail so that it can later reproduce us in the most fictional scenarios.
To achieve this, we’ll fine-tune this model with a set of images, binding them to a unique identifier that references us.
But wait a minute... How many of these images will we need? Deep Learning models usually require large amounts of data to produce meaningful results (even more so these large image synthesis models). Does this mean that we need thousands of pictures of ourselves for the model to reproduce us faithfully?
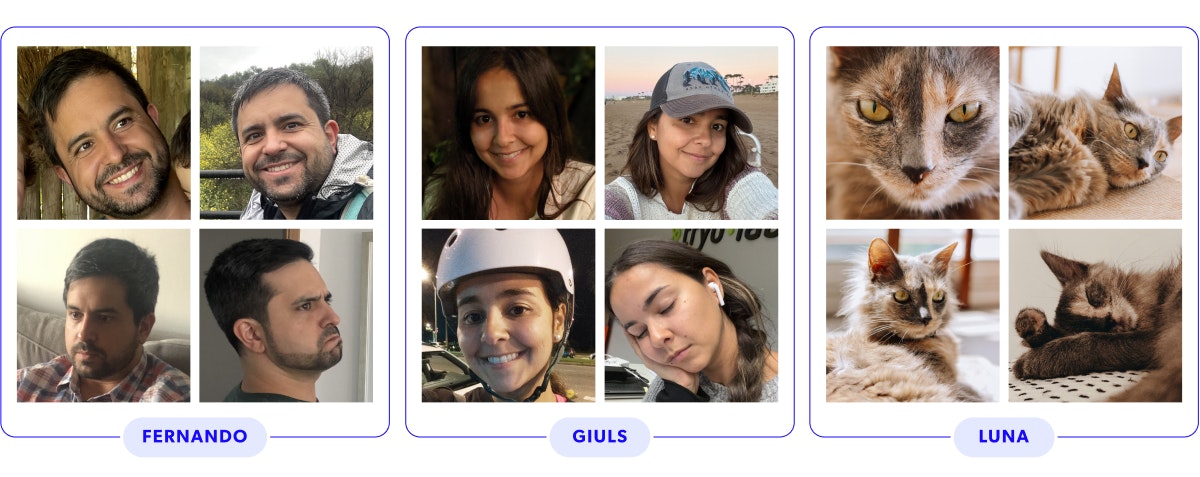
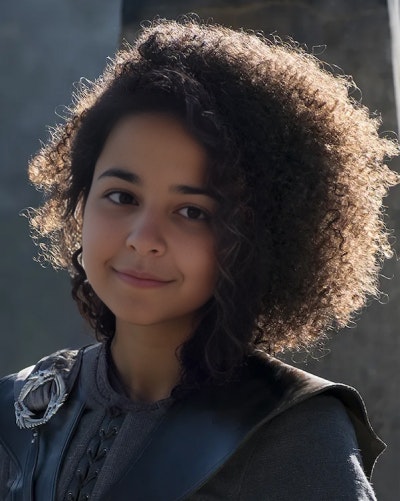
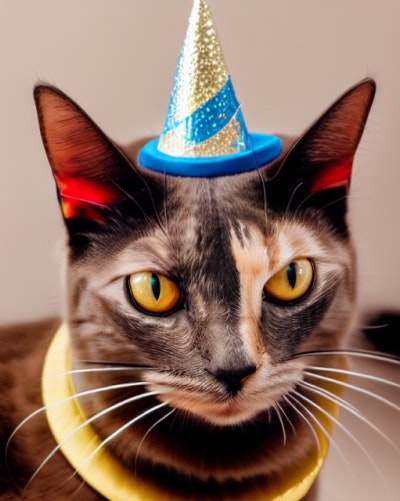
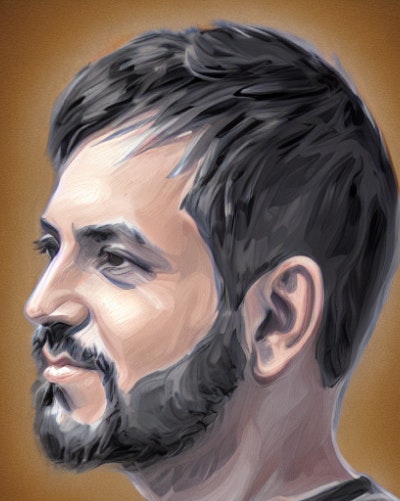
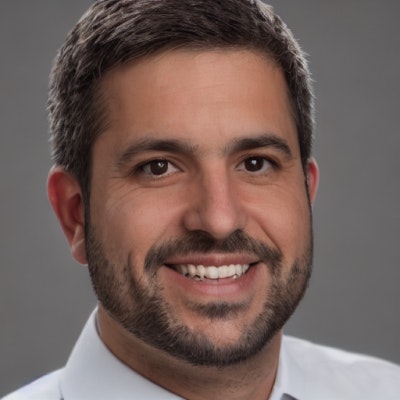
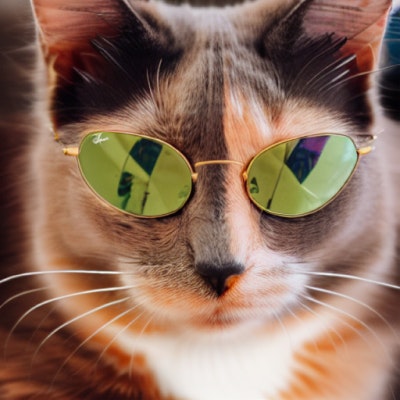
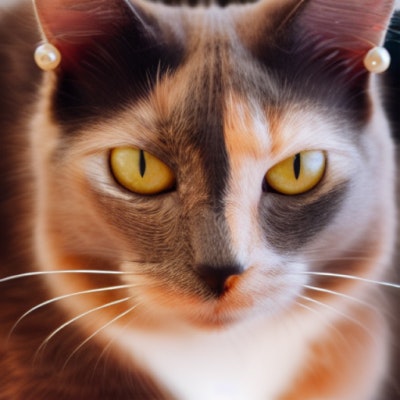
Fortunately, the answer is no. The technique we’re about to show you achieves results like you have seen above with no more than a dozen images of your face. Still, these images must exhibit some variation in terms of different perspectives of your face (e.g., front, profile, angles in between), facial expressions (e.g., neutral, smiling, frowning), and backgrounds. Here are examples from the three victims we chose for this blog post: Fernando, Giuls, and Luna (from left to right).

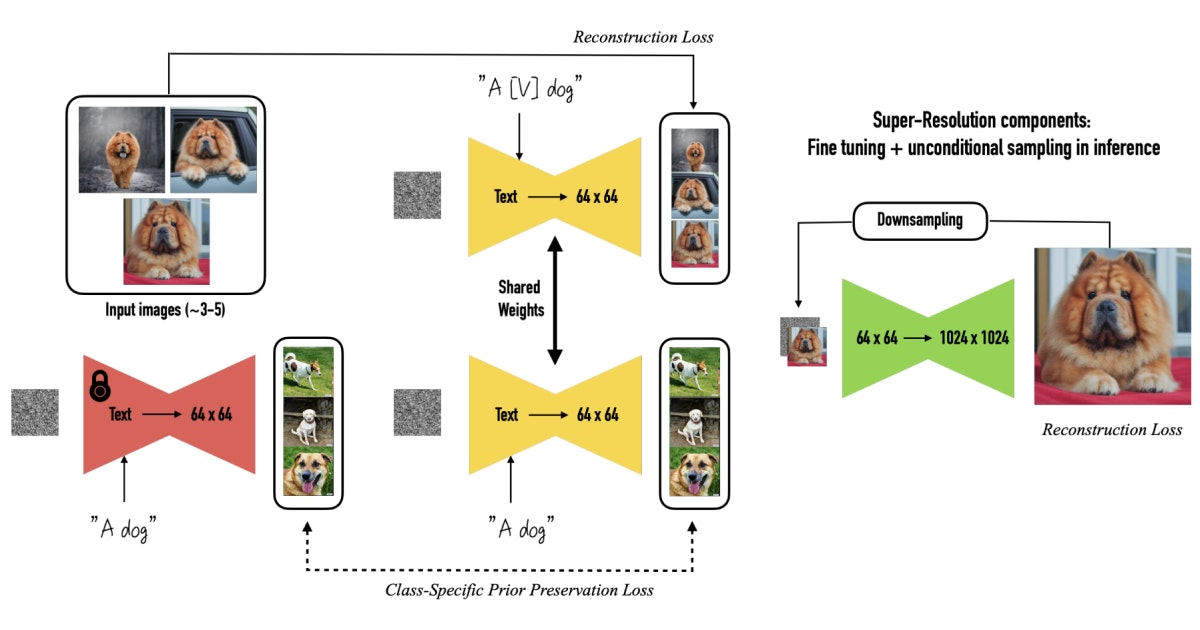
Once you’ve collected these images, the next step is to label them with a text prompt. Following the instructions in DreamBooth’s paper, we’ll use the prompt A [token name] [class noun] where [token name] is an identifier that will reference us, and [class noun] is an already existing class in the model’s vocabulary which describes us at a high level. For instance, for Fernando Bernuy (co-writer and one of the victims of our experiment), a possible prompt would be A fbernuy man. Other examples of class nouns include woman, child, teenager, dog, or sunglasses. Yes, this approach works with animals and other objects too!
The motivation behind linking our unique identifier with a class noun during training is to leverage the model’s strong visual prior of the subject’s class. In other words, it will be much easier for the model to learn what we look like if we tell it that we are a person and not a refrigerator. The authors of DreamBooth found that including a relevant class noun in the training prompts decreased training speed and increased the visual fidelity of the subject’s reproduced features.
However, there are still two issues we must address before we can fine-tune the model:
The first one is overfitting: these extremely large generative models will inevitably overfit such a small set of images, no matter how varied it may be. This means that the model will learn to reproduce the subject with high fidelity, but mostly in the poses and contexts present in the training images.

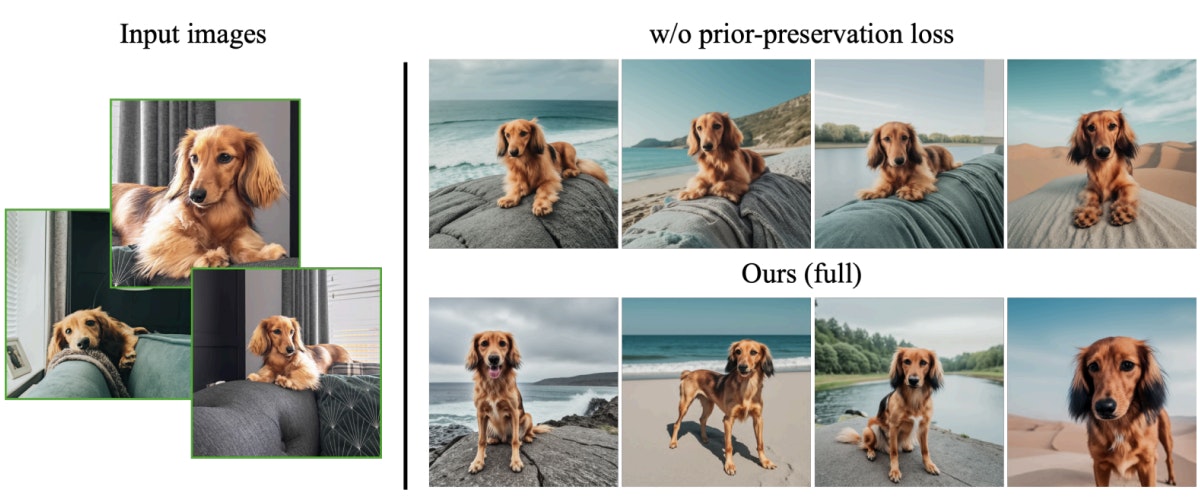
The second is language drift: since the training prompts contain an existing class noun, the model forgets how to generate different instances of the class in question. Instead, when prompted for a [class noun], the model returns images resembling the subject on which it was fine-tuned. Essentially, it replaces the visual prior it had for the class with the specific subject that we introduced into its output space. And although Fernando is a handsome man, not all men look like him!

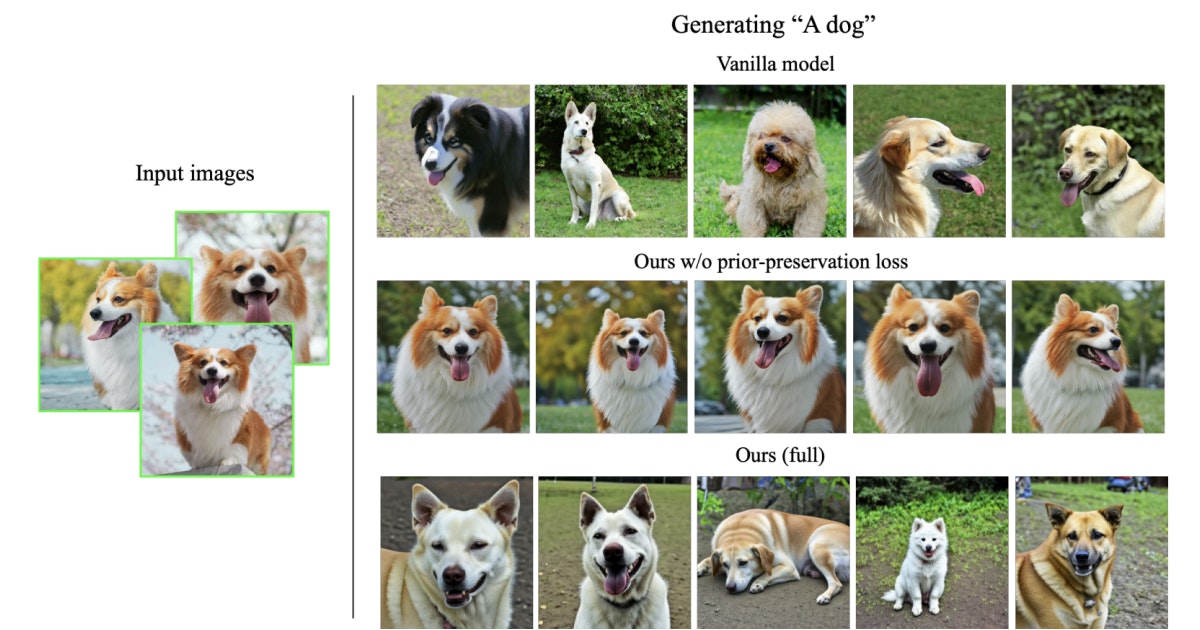
To solve both issues, the authors of DreamBooth propose a class-specific prior-preservation loss. Simply put, the idea is to supervise the fine-tuning process with the model’s own generated samples of the class noun. In practice, this means having the model fit our images and the images sampled from the visual prior of the non-fine-tuned class simultaneously. These prior-preserving images are sampled and labeled using the [class noun] prompt. This helps the model remember what a generic member of the subject class looks like. The authors recommend sampling a number of [class noun] images, where stands for the number of images of the subject.
Now that we’ve covered all the relevant pieces of the theory, all that’s left is to fine-tune the image synthesis model. Let’s do it!
Fine-tuning stable diffusion with your photos
Three important elements are needed before fine-tuning our model: hardware, photos, and the pre-trained stable diffusion model.
The original implementation requires a large amount of GPU resources to train, making it difficult for common Machine Learning practitioners to reproduce. However, a community in discord has developed an unofficial implementation that requires less computing resources. If you happen to have access to a machine with at least 16GB VRAM GPU, you can easily train your model following Hugging Face’s DreamBooth training example instructions. If you don’t, we’ve got you covered! In this post, we’ll show you how to train and run inference in a free-tier Google Colab. Yes, you’ve read that right, a free-tier Google Colab!

Note that the notebook used may be outdated due to the rapid advancements in the libraries used, but it has been tested and confirmed to still be functional. January 2022.
The second element is the subject’s photos. In this tutorial, we’re gonna use pictures of members of the TryoGang and one of our pets. In any case, there are some rules we need to follow to get the best possible results.
As mentioned in the motivation section, Stable Diffusion tends to overfit the training images. To prevent this, make sure that the training subset contains the subject in different poses and locations. Even though the original paper recommends using 4 to 6 images, the community in Discord has found that using 10 to 12 images leads to better results. As a rule of thumb, we’ll use 2 images that include the torso and 10 of the face, with different backgrounds, styles, expressions, looking and not looking at the camera, etc.
If you’re looking at the camera and smiling in every photo, don’t expect the model to generate you looking sideways or with a neutral face, so avoid using selfies only!
In addition, make sure to crop the training images to a square ratio since Stable Diffusion scales them down to 64 x 64 to use them for training.
And last but not least, we’ll need the pre-trained Stable Diffusion model’s weights. These can be downloaded from Hugging Face, for which we’ll need to create an account, read the model card and accept the terms and conditions. Don’t download the model manually because the training script will do it automatically.
Now that we’ve got everything set up, let’s fine-tune the model!
Training
We will use this implementation that includes a notebook ready to use in Google Colab. You can open the notebook by clicking on this link.
Before running it, let’s modify it for our use case (we’ll use Fernando as the subject to illustrate the instructions). We need to define four parameters for the training process:
- TOKEN NAME: corresponds to the unique identifier which will reference the subject we want to add. This name should be unique, so we don’t have to compete with an existing representation. Here we can use a simple
first initial + last nametoken name, such asfbernuy. - CLASS NAME: This is the class name we introduced in the motivation section. The original DreamBooth paper recommends using generic classes such as man, woman, or child (if the subject is a person) or cat or dog (if the subject is a pet). However, the Discord community implementing the approach on Stable Diffusion has found that using celebrities who are similar to the subject produces better results. In our case, we used George Clooney when the subject is a man and Jennifer Anniston when it’s a woman. We still used the “cat” class for Luna, as we couldn’t think of a suitable famous cat other than Garfield.
- NUMBER OF REGULARIZATION IMAGES: As mentioned in the motivation section, we need the class-specific prior-preservation loss to prevent overfitting and language drift issues. We followed the original authors’ recommendation of using 200 images per training image. Remember that using more regularization images may lead to better results.
- TRAINING ITERATIONS: This parameter defines the number of iterations the model will run during the fine-tuning process. If this number is too low, the model will underfit the subject’s images and won’t be able to reproduce it accurately during inference. If it’s too high, the model will overfit instead, making it unable to reproduce the subject with expressions, poses, or contexts outside of those in the training subset. A rule of thumb that has shown good results in our experiments is to use between 100 and 200 iterations per training image. Since we have 12 images of Fernando, let’s use 2400 iterations.
Now let’s modify the notebook with these parameters as follows:
Settings and run: we’ll modify the
CLASS_NAMEtogeorgeclooney. Also, we’ll replace the defaultskstoken name withfbernuyin theINSTANCE_DIRandOUTPUT_DIR. This will make it easier to identify the directory in which the model and the data will be saved.Start Training:
Now we are ready to run the notebook and fine-tune our model. The first few cells will install the required dependencies. After this, we’ll be prompted to log in to HuggingFace using our access token.
Then, we’ll be asked to upload the subject’s photos. Here, can use the Choose Files button and select the images from our computer or upload them directly to the subject’s directory inside the data folder in the Colab instance. The next cell is where the magic happens. We finally get to fine-tune the model! The script will download the pretrained model’s weights, generate the regularization images, and then execute the specified number of training iterations. The entire process should take about an hour and a half, so be patient. Remember to keep an eye on the notebook!
Once training is over, we’ll be prompted to convert the model to a ckpt file. This is highly recommended since it’s a requirement for an extremely useful web interface that we’ll introduce further down in this blog post. Once we’ve saved the ckpt file in the notebook instance, we’ll download it to our local machine or save it to our drive folder.
We can test our fine-tuned model by running the cells below the “Inference” section of the notebook. The first cell loads the model we just trained and creates a new Stable Diffusion pipeline from which to sample images. We can set a seed to control random effects in the second cell. And now, the moment you’ve been anticipating since you started reading this blog post: generating our custom images!
The cell titled “Run for generating images” controls the image-generating process. There’s a total of 7 parameters that we can modify to customize our image:
prompt: the text prompt that will guide the image’s generation. Here’s where we should include the token name that references our subject.negative_prompt: serves to specify what we don’t want to see in the image. For instance, if we want to generate an image with a cloudy sky, we enterclear skyas the negative prompt.num_samples: the number of images the model will generate in a single batch.guidance_scale: also known as CFG Scale, is a float that controls how much importance is given to the input text prompt. Lower values of this parameter will allow the model to take more artistic liberties when generating the images.num_inference_steps: the number of denoising steps that the model will run. A higher number of steps will usually lead to more detailed images at the cost of an increased inference time. Be careful with this parameter, though, since too many steps may lead to visual artifacts in the images.height: the height of the generated image in pixels.width: the width of the generated image in pixels.
There’s no magic formula to generate the perfect image, so you’ll probably have to play around with these parameters for a while before achieving the results you want. If you’re having trouble generating cool images, don’t get discouraged! Some of the most common issues have pretty straightforward solutions, according to Joe Penna (one of the managers at the Stable Diffusion Discord channel).
- If they don’t look like the subject: Check to see if the prompt is right and if the images follow the tips we gave before. Try including the class name in the prompt and the token name (i.e.,
a photo of TOKEN_NAME georgeclooney). We may also need to train for more iterations. - If they look too much like the training images: we might have trained for too long, used too few images, or our images may be too similar. We modify the prompt by including the token name towards the end of it, for instance:
an exquisite portrait photograph, 85mm medium format photo of TOKEN_NAME with a classic haircut. - If using a complex prompt doesn’t give us the desired results: we might have trained for too few iterations. We can try repeating the token name in the prompt, for instance:
TOKEN_NAME in a portrait photograph, TOKEN_NAME in an 85mm medium format photo of TOKEN_NAME.
Although the notebook is extremely useful for training the model, it’s far from being the best platform to generate images. In the following section, we’ll introduce an incredibly powerful tool to enhance the image generation process further.
In practice: generating cool images
Creating great images requires both practice and patience. However, this process can be alleviated by using the right tools. The one we’re about to show you is truly mind-blowing; it’s so versatile that we can’t recommend it enough! It’s a WebUI that makes the entire process more interactive and fun.
To use it, we must run a web server and follow the Install instructions available for Linux, Windows, or Apple Silicon. Alternatively, we can run the server on another Colab using this link. Beware that time flies when generating images, and Colab’s free tier is limited!
Once installed, we’ll copy our model’s ckpt file in the web server folder, stable-diffusion-webui/models/Stable-diffusion, and then run the web server script (webui.sh or webui.bat). This gives us the UI’s address and port so we can open it using our favorite browser.

The UI has many different features. We highly recommend exploring the project’s wiki. The development of Stable Diffusion and this UI are moving fast, so be aware that this may change!
The first thing we need to do is to select our fine-tuned Stable Diffusion model. At the top of the WebUI page, we’ll find a drop-down menu with all the available ckpt files. If you don’t see yours in the list, verify that you copied the ckpt file to the correct directory.
For this tutorial, we’ll focus on explaining the UI’s main three functionalities: text to image, image to image, and inpainting.
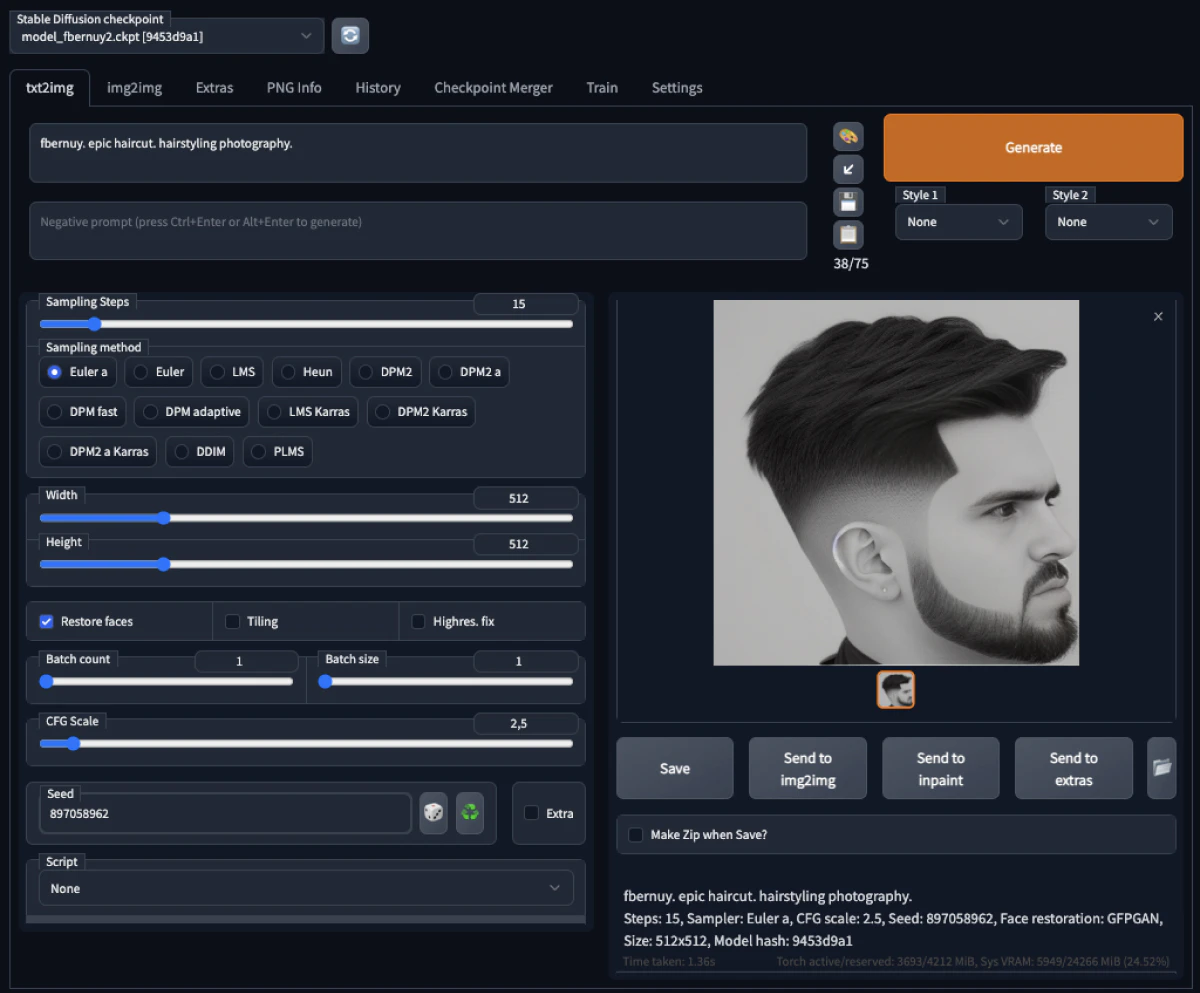
Text to Image (txt2img)
Text to image is the most straightforward way to use our model: write a prompt, set some parameters, and voilà! The model generates an image that matches the prompt according to the chosen parameters.
This might sound easy at first glance. However, we might need to try several parameter combinations before hitting the spot. Based on our experience, these are the steps we recommend following to generate the coolest images:
- Pick a style from lexica.art and add your subject to its prompt. For instance, let’s see what Fernando would look like with a new haircut:
fbernuy. epic haircut. hairstyling photography. - Use a random seed until you get something similar to what you have in mind. It might not look exactly like the subject, but we can fix that later.
- Copy the seed from the image description and use it to generate the same image with different parameters. The best way to do this is to use the
X/Y plotscript: select a list of steps (10, 15, 20, 30) and a list of CFG Scales (2.0, 2.5, 3.0, 3.5, 4.0). The tool will plot a matrix with one image for each input step and scale combination. We can also use other parameters as theXandYvariables. - Then, pick the one you like the most, copy its corresponding parameter values, and remove the script to generate the selected image alone. If you don’t like any of the images, try with different parameters, a different seed, or a different prompt!

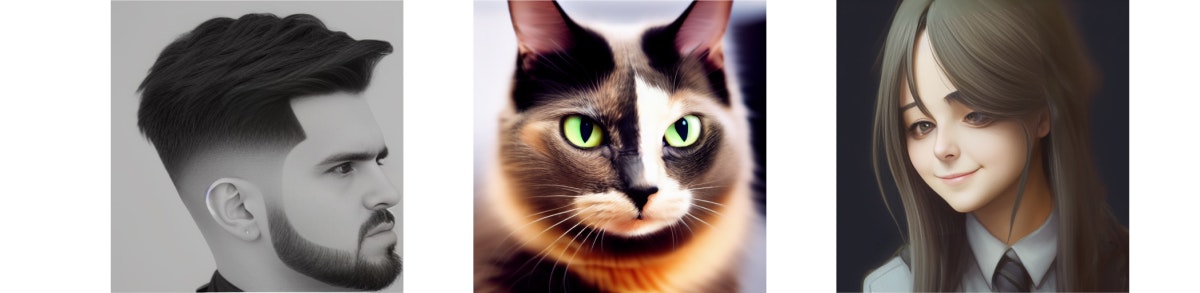

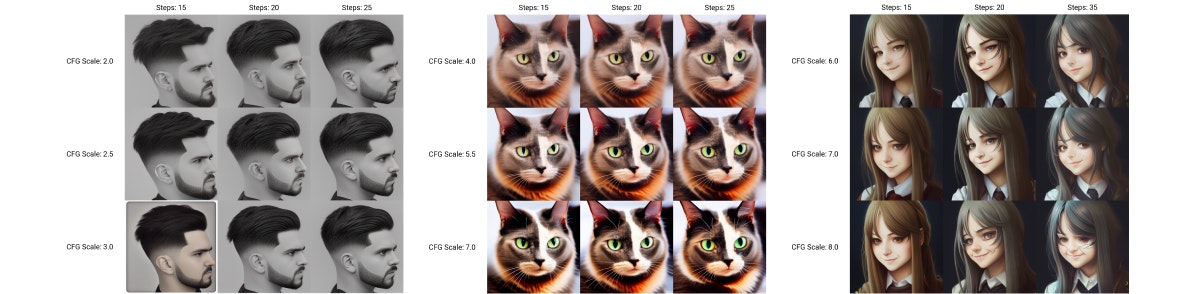
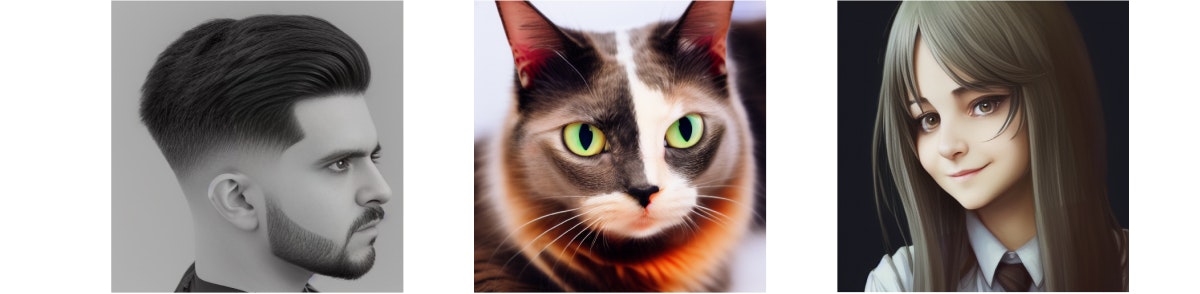
Image to Image (img2img)
The second alternative is to generate a new image based on an existing image and a prompt. The model will modify the entire image, so we can apply new styles or make a small retouch.
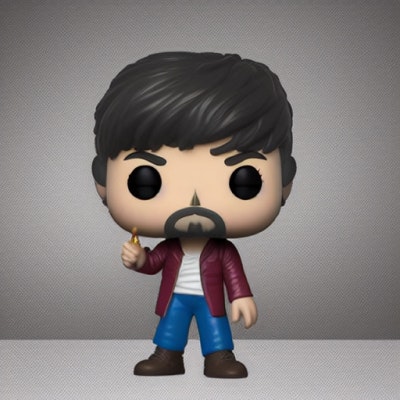
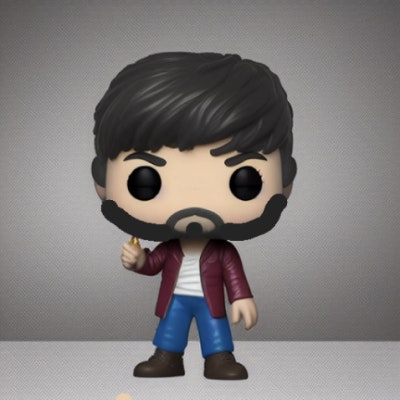
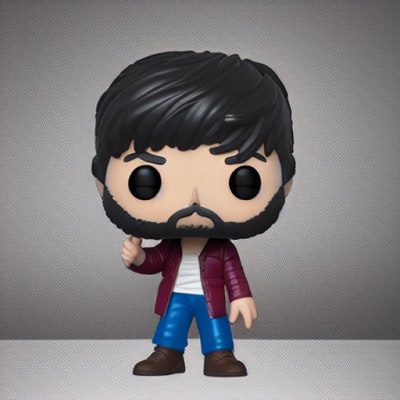
Let’s start with a txt2img prompt: very very intricate photorealistic photo of a fbernuy funko pop, detailed studio lighting, award - winning crisp details. Following the strategy explained above, we use txt2img and generate undoubtedly cool looking Funko Pop. However, we’d like to improve the beard to be closer to our subject and lighten the nose color.
To do this, we’ll click on the Send to img2img button and manually draw the beard style and nose we want using the MS Paint-like tool of the WebUI (center). We can reduce the denoising strength parameter to have a result as similar as possible to the original and experiment with the rest of the usual parameters until we get the result we are looking for (right).

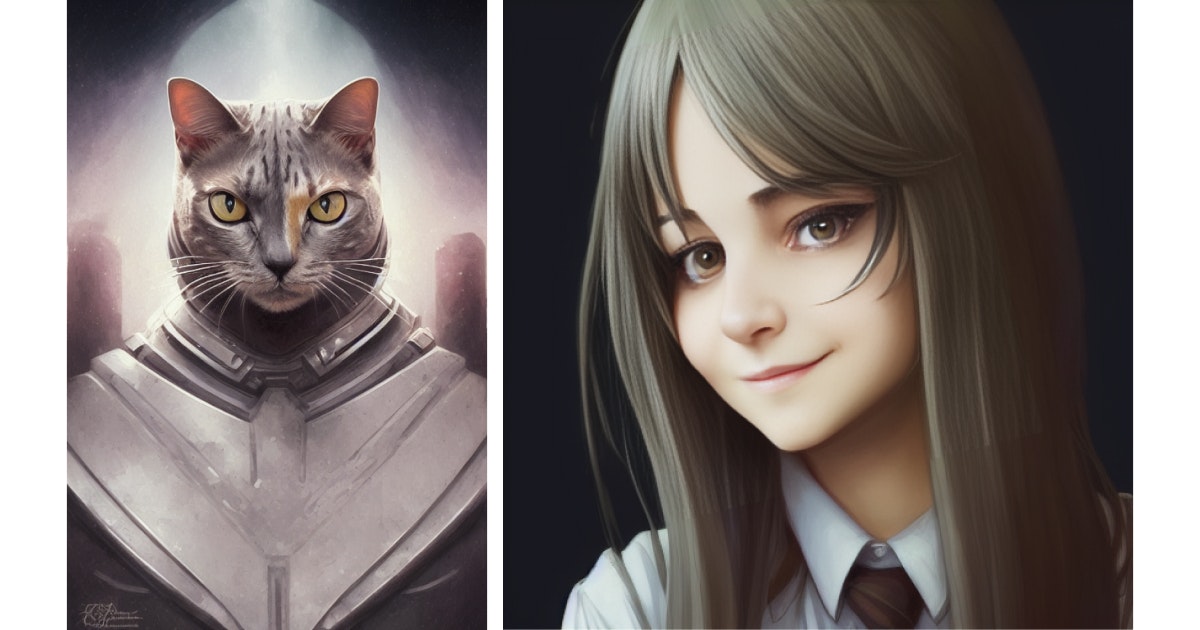
Following the same img2img strategy, we slightly improved Luna's fur colors in this epic picture and added some smile lines to the anime version of Giuls.
Inpainting
The third alternative allows us to specify a region in the image for our model to fill, maintaining the rest of the image intact (unlike the img2img method, which modifies the entire input image). This can be useful for swapping a face in an existing photo (if the subject is a person) or generating an image of the subject in a different scenario or lighting condition while preserving the background and context. Keep in mind that using this method is a bit more challenging because there are more parameters to explore.
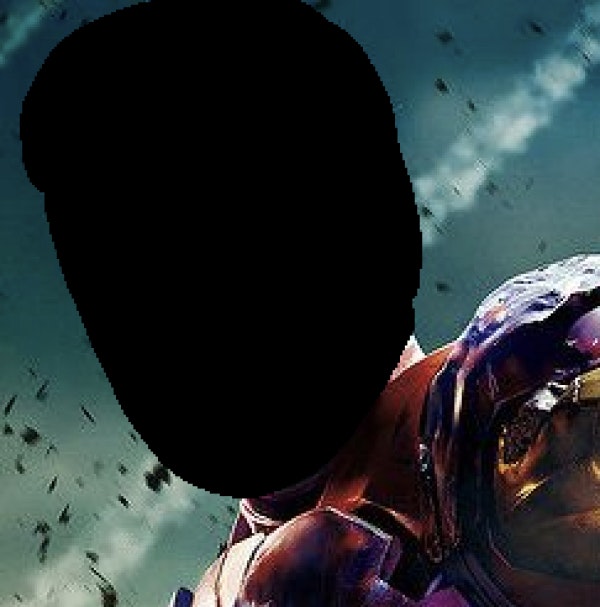
For example, let’s generate an image of Fernando as Ironman. Since the armor has a lot of important details, we’ll use an original image from the movie poster as the source and swap Ironman’s face using the Inpainting tool.
The first thing we’ll do is select the Inpainting tool inside the img2img tab. After uploading our reference image, we’ll select the area around the head with the brush tool and input a photo of fbernuy as the prompt since we don’t want the model to fill this region with anything else but Fernando’s face.


Before generating the image, let’s take a look at the most relevant parameters added in inpaint.
- Masked content: defines what to fill the masked region with. We can select
original(the default) if the original content is similar to what we want to achieve, experiment withfillto help us keep the surrounding information, orlatent noiseto use noise. Regardless of the option we pick, random noise will be added based on theDenoising strengthparameter. - Denoising strength: defines the standard deviation of the random noise added to the masked region. The higher this parameter, the lower the similarity with the content in the unmasked portion of the image.
- Inpaint at full resolution: inpainting resizes the whole image to the specified target resolution by default. With this parameter enabled, only the masked region is resized, and the result is pasted back into the original picture. This helps get better results for small masks as the inpainted region is rendered at a much larger resolution.
For this example, we’ll use original masked content (since the masked region is already a face) with 0.50 denoising strength and enable inpainting at full resolution. Then, we’ll set a random seed -1 and repeat the process we’ve done before: patiently generate images until we get one similar to what we desire. Finally, we’ll fix the seed and use the X/Y plot script to explore different Sampling Steps and CFG Scale combinations.

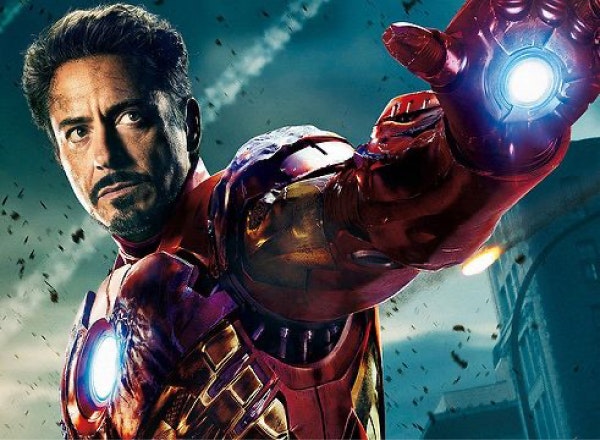
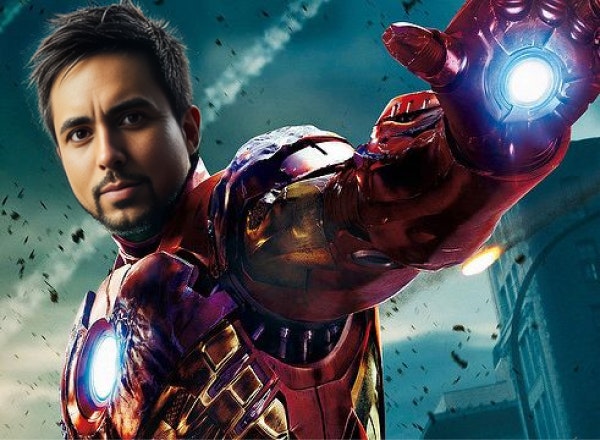
Pretty awesome, right? At this point, we’ve generated a great image that kept all the details of the original picture but with Fernando’s face instead of Robert Downey Jr.’s. Still, there’s one small detail we want to fix in the beard.
The best way to fix this is by using inpainting again, but using the already inpainted image instead of the original (didn’t see that one coming, did you?). This way, we can instruct the model to modify the region around the beard exclusively and input a more specific prompt, such as a photo of fbernuy with a beard.

We have shown you how to create cool images of you, your friends, your pets, or any particular item you want, either starting from just an idea, a sketch, or an existing image!
Now you are ready to generate cool images on your own! Here are some images we generated from our subjects that can be useful for you to get some inspiration. Have fun!

Final thoughts
Stable Diffusion signified one of the biggest leaps toward democratizing large image synthesis models. Techniques such as DreamBooth (and their community-driven implementations) allow us to reap the benefits of these models even further, with imagination being our only limit. We are extremely excited to know where this new democratic AI paradigm will lead us and the various ways in which the world will benefit from it.

Wondering how AI
can help you?

Terms and Conditions | © 2026. All rights reserved.